I typically have a fairly clean and simple style, personally and in my card making. But just like it's fun to get dressed up every once in awhile, it's also fun to make a card that's a little more "fussy," like this playful birthday card:
Supplies (all Stampin' Up! unless otherwise noted):
Stamps: Hello Love, Cheep Talk, Endless Birthday Wishes
Paper: Baked Brown Sugar, Pool Party, Chocolate Chip, Gumball Green, textured Crushed Curry, Whisper White card stock
Ink: Chocolate Chip, Bermuda Bay, Gumball Green, Crushed Curry
Accessories: Woodgrain embossing folder, Cloudy Day embossing folder, Stitched Hillside Borders dies (Lawn Fawn), Petite Petals punch, owl button (Babyville Boutique), Jolee's by You flowers (EK Success), Word Bubbles Framelits dies, stylus, Dimensionals, Mono Multi liquid glue
I had a lot of fun choosing all the different textures and details for this card, but I think my favorite part is probably the tree. Originally I wanted to use the tree image from the Nuts About You set and just stamp it, but the proportion wasn't right for the owl button. So, using that image as a guide, I drew my own tree on Chocolate Chip card stock, cut it out and then embossed it with the Woodgrain embossing folder.
To make the leaves I punched several Petite Petals shapes out of Gumball Green card stock. Then I used a scissors to cut the petals apart, trimming them into leaf shapes. The leaves were a little too small to emboss, but I didn't want to leave them flat, either. Instead I decided to give them a little dimension. I placed the leaves on a piece of thick foam (a Stampin' Pierce Mat or an old mouse pad are good options) and rubbed a stylus on each one in a circular motion. As you put pressure on the card stock, the leaf will begin to curl up. (If you don't have a stylus on hand, you could use something else that has a rounded end, such as a paintbrush or possibly a ballpoint pen.) Once the leaves were all shaped, I used liquid glue to adhere them around the tree branches.
The inside of this card was actually more challenging for me than the front of the card. I wanted to continue the bird/tree theme, so I tried a few different images and layouts. But nothing seemed to coordinate with the front of the card; it looked like the inside was from a completely different card. I finally pulled out a long-retired set called Cheep Talk, and that one seemed to do the trick. The leaves on the branch image were a similar shape to the card stock leaves on the front of the card, and I thought that the style of this bird complemented the owl button. I used markers to apply ink directly to the stamps to create the multicolored images. To finish the sentiment of the card, I used Endless Birthday Wishes to stamp the greeting in a word bubble, which I adhered to the panel with Dimensionals.
I really enjoyed making this card, and I love the final product. Do you like to make involved, detailed cards, or do you prefer to stick to clean and crisp style?
Thanks for stopping by!
Sunday, May 3, 2015
Wednesday, April 29, 2015
Barrettes for a first birthday
Last weekend I attended the first birthday party for the daughter of one of my cousins. I had a couple of small gifts for her (a board book and a set of cute snack containers), but I also wanted to give her something handmade, so I pulled out the supplies for making ribbon barrettes.
Supplies for barrettes (all decorative supplies are Stampin' Up! unless otherwise noted):
Ribbon: Dress Up Ribbon Originals, Chocolate Chip taffeta ribbon, Pool Party ruffled ribbon
Embellishments: Jolee's Boutique black flowers (EK Success), Sweet Pea stitched felt, Accents & Elements Fleurettes
Other: Single-prong curl clips, hot glue gun
Supplies for holder (all Stampin' Up!):
Stamps: Just for You
Paper: Basic Gray card stock
Ink: Basic Graynch
Accessories: Scalloped Tag Topper punch, Horizontal Slot punch
These barrettes are very easy to create, and I've made quite a few of them. (See the link above for step-by-step instructions and photos, and search my blog for "barrettes" or "ribbon barrettes" and you'll find other examples.) Once I have all the supplies together I can make a pair of barrettes in five minutes or less. Perfect for a last-minute gift!
To make a holder for presenting the barrettes, select a neutral color of card stock so the barrettes are the focal point. I used a piece of Basic Gray card stock that was just under 2" wide and 8-1/2" long. (The length of the card stock will vary depending on how many barrettes you want to include.)
I punched the top of the card stock with the Scalloped Tag Topper punch and then set the barrettes on the card stock so I could play with the spacing. Once I had them arranged I used the Horizontal Slot punch to make a slot for each barrette. Notice that I alternated which direction the barrettes are facing, so I also alternated on which side I punched the slots. For the top and bottom pairs I punched from the right side of the card stock; for the middle pair I punched from the left. Then I just opened each barrette and slipped the back part through a slot.
I had some extra space above the top pair of barrettes, so I added a simple "just for you" stamp, which was the perfect finishing touch for this little gift. In all honesty, the recipient doesn't have much hair, yet; I hope it will come in soon so she can try out her barrettes.
Thanks for stopping by!
Supplies for barrettes (all decorative supplies are Stampin' Up! unless otherwise noted):
Ribbon: Dress Up Ribbon Originals, Chocolate Chip taffeta ribbon, Pool Party ruffled ribbon
Embellishments: Jolee's Boutique black flowers (EK Success), Sweet Pea stitched felt, Accents & Elements Fleurettes
Other: Single-prong curl clips, hot glue gun
Supplies for holder (all Stampin' Up!):
Stamps: Just for You
Paper: Basic Gray card stock
Ink: Basic Graynch
Accessories: Scalloped Tag Topper punch, Horizontal Slot punch
These barrettes are very easy to create, and I've made quite a few of them. (See the link above for step-by-step instructions and photos, and search my blog for "barrettes" or "ribbon barrettes" and you'll find other examples.) Once I have all the supplies together I can make a pair of barrettes in five minutes or less. Perfect for a last-minute gift!
To make a holder for presenting the barrettes, select a neutral color of card stock so the barrettes are the focal point. I used a piece of Basic Gray card stock that was just under 2" wide and 8-1/2" long. (The length of the card stock will vary depending on how many barrettes you want to include.)
I punched the top of the card stock with the Scalloped Tag Topper punch and then set the barrettes on the card stock so I could play with the spacing. Once I had them arranged I used the Horizontal Slot punch to make a slot for each barrette. Notice that I alternated which direction the barrettes are facing, so I also alternated on which side I punched the slots. For the top and bottom pairs I punched from the right side of the card stock; for the middle pair I punched from the left. Then I just opened each barrette and slipped the back part through a slot.
I had some extra space above the top pair of barrettes, so I added a simple "just for you" stamp, which was the perfect finishing touch for this little gift. In all honesty, the recipient doesn't have much hair, yet; I hope it will come in soon so she can try out her barrettes.
Thanks for stopping by!
Sunday, April 26, 2015
Birthday flip card
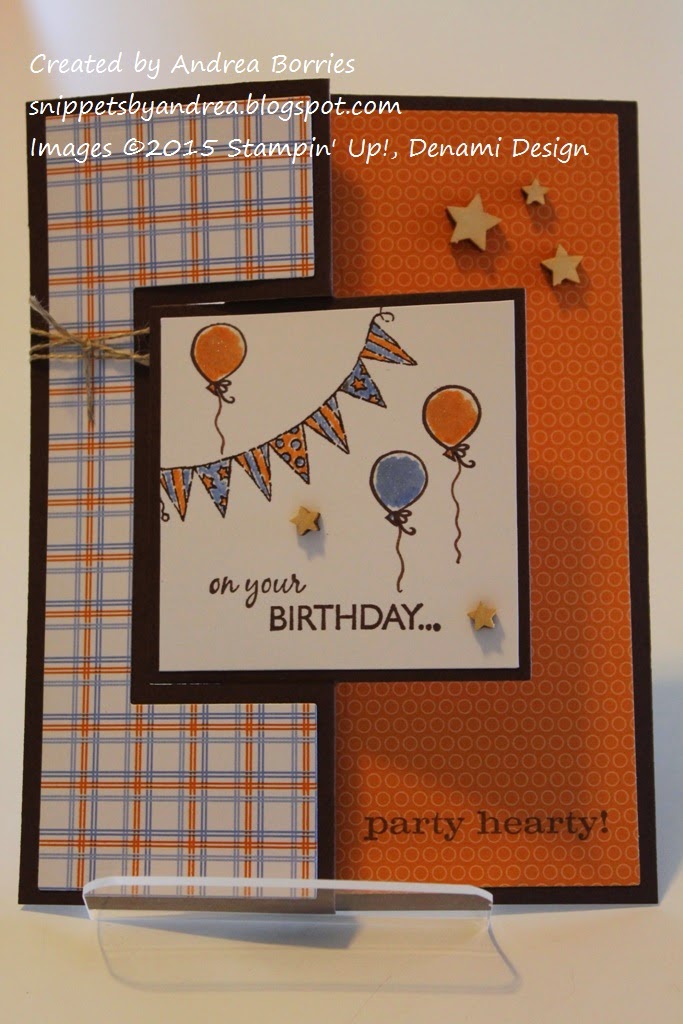
I haven't had a lot of stamping time during the past few weeks -- life happens, distractions pop up -- and the time I have had hasn't been very productive. But I do have a few projects I need to tackle this week and next, so I'm hoping my mojo gets back in gear. At any rate, here is a flip card I made for a recent birthday:
Supplies (all Stampin' Up! unless otherwise noted):
Stamps: Packed for Birthday, On Your Birthday, Party Hearty, birthday Petite Fours set (Denami Design)
Paper: Chocolate Chip, Whisper White card stock; Pawsitively Prints Designer Series Paper (DSP)
Ink: Chocolate Chip, Ballet Blue, Pumpkin Pie
Accessories: Square Flip-Its #2 dies (Sizzix), Wink of Stella clear glitter brush pen (ZIG), wooden stars from Hooray It's Your Day card kit, linen thread, Mono Multi liquid glue
This card was for a teen boy, which is a challenging demographic for me. I don't really have any images that are "cool" (or whatever the young 'uns say today), so I decided to stick with generic birthday images and a good "boy" color scheme: brown, orange, and blue.
The banner is from the Packed for Birthday stamp; I used a marker to color just that part of the image and then stamped it across the upper left corner of a piece of Whisper White card stock. I added the sentiment and a few balloons (with hand-drawn strings) and colored the images with Ballet Blue and Pumpkin Pie, the two colors that coordinated with the DSP I used for the background.
I thought sequins or rhinestones might be too "girly" for this card, so for embellishment I glued a few wooden stars on the focal panel and on the upper right corner of the card base. I did want to add a little sparkle for some visual interest, so I pulled out my brand new Wink of Stella glitter brush pen and painted some clear glitter over the balloons. It was the perfect amount of glitter -- enough to catch the light when you move the card, but not enough to overpower the rest of the card. (I can't wait to try out the other two glitter brush pens I bought.)
On the reverse side of the flip panel I adhered a piece of Whisper White card stock stamped with a sentiment surrounded by a few fireworks images. I also used the glitter pen on the center of the fireworks -- fireworks need to sparkle, right? To finish off the background, I stamped an additional sentiment on the bottom of the DSP on the right side and tied a piece of linen thread around the middle of the left panel.
Thanks for stopping by!
Supplies (all Stampin' Up! unless otherwise noted):
Stamps: Packed for Birthday, On Your Birthday, Party Hearty, birthday Petite Fours set (Denami Design)
Paper: Chocolate Chip, Whisper White card stock; Pawsitively Prints Designer Series Paper (DSP)
Ink: Chocolate Chip, Ballet Blue, Pumpkin Pie
Accessories: Square Flip-Its #2 dies (Sizzix), Wink of Stella clear glitter brush pen (ZIG), wooden stars from Hooray It's Your Day card kit, linen thread, Mono Multi liquid glue
This card was for a teen boy, which is a challenging demographic for me. I don't really have any images that are "cool" (or whatever the young 'uns say today), so I decided to stick with generic birthday images and a good "boy" color scheme: brown, orange, and blue.
The banner is from the Packed for Birthday stamp; I used a marker to color just that part of the image and then stamped it across the upper left corner of a piece of Whisper White card stock. I added the sentiment and a few balloons (with hand-drawn strings) and colored the images with Ballet Blue and Pumpkin Pie, the two colors that coordinated with the DSP I used for the background.
I thought sequins or rhinestones might be too "girly" for this card, so for embellishment I glued a few wooden stars on the focal panel and on the upper right corner of the card base. I did want to add a little sparkle for some visual interest, so I pulled out my brand new Wink of Stella glitter brush pen and painted some clear glitter over the balloons. It was the perfect amount of glitter -- enough to catch the light when you move the card, but not enough to overpower the rest of the card. (I can't wait to try out the other two glitter brush pens I bought.)
On the reverse side of the flip panel I adhered a piece of Whisper White card stock stamped with a sentiment surrounded by a few fireworks images. I also used the glitter pen on the center of the fireworks -- fireworks need to sparkle, right? To finish off the background, I stamped an additional sentiment on the bottom of the DSP on the right side and tied a piece of linen thread around the middle of the left panel.
Thanks for stopping by!
Sunday, April 19, 2015
Old reliable Lovely As a Tree
I needed a quick masculine birthday card last week, so I turned to a classic Stampin' Up! stamp set: Lovely As a Tree.
Supplies (all Stampin' Up!):
Stamps: Lovely As a Tree; Up, Up & Away; Hardwood
Paper: Watercolor paper, Soft Suede card stock, wood sheets
Ink: Jet Black StazOn, Soft Suede ink pads; Pear Pizzazz, Soft Sky, Pool Party ink refills
Accessories: Aqua Painter, Dimensionals
I actually started this card by making the "frame" with 1/4" wide strips of the wood sheets. I cut the ends of each strip in a diagonal and then assembled them in a rectangle, using little pieces of adhesive on the back of the frame to hold it together. Then I just stared at the frame for awhile, trying to decide what to do with it. Hmm ... After playing around with a few ideas that weren't quite right, I pulled out Lovely As a Tree. I've made a couple of similar cards with this image over the past ten months (using Watercolor Wonder Crayons and as a set of one-layer cards), so I wasn't sure if I should use it again. But sometimes when you're stuck, you need to pull out an old reliable idea.
I stamped the image on watercolor paper using StazOn ink. To add the color I placed drops of Soft Sky, Pool Party, and Pear Pizazz ink refill inside the open lids of the same color ink pads. (You could use any non-porous surface, such as a large clear block or a piece of acetate, but by using the ink pads, you don't have to clean up when you're done; just close the pad.) I dipped my Aqua Painter in one of the colors and brushed the ink across the paper, using fairly quick and steady strokes and picking up more ink as needed. For the sky, I first applied Soft Sky ink at the horizon line. Then I blended that with Pool Party, moving up the image.
After the piece dried a bit, I decided it needed one more detail, so I stamped the image of the birds from Up, Up & Away between two of the trees. I trimmed the panel, adhered it behind the frame, and then used Dimensionals to attach it to the Soft Suede card base, which I had already stamped with the Hardwood background. I thought about adding some linen thread or another embellishment, but I decided I liked it just the way it was, and I hope the recipient did, too!
Thanks for stopping by!
Supplies (all Stampin' Up!):
Stamps: Lovely As a Tree; Up, Up & Away; Hardwood
Paper: Watercolor paper, Soft Suede card stock, wood sheets
Ink: Jet Black StazOn, Soft Suede ink pads; Pear Pizzazz, Soft Sky, Pool Party ink refills
Accessories: Aqua Painter, Dimensionals
I actually started this card by making the "frame" with 1/4" wide strips of the wood sheets. I cut the ends of each strip in a diagonal and then assembled them in a rectangle, using little pieces of adhesive on the back of the frame to hold it together. Then I just stared at the frame for awhile, trying to decide what to do with it. Hmm ... After playing around with a few ideas that weren't quite right, I pulled out Lovely As a Tree. I've made a couple of similar cards with this image over the past ten months (using Watercolor Wonder Crayons and as a set of one-layer cards), so I wasn't sure if I should use it again. But sometimes when you're stuck, you need to pull out an old reliable idea.
I stamped the image on watercolor paper using StazOn ink. To add the color I placed drops of Soft Sky, Pool Party, and Pear Pizazz ink refill inside the open lids of the same color ink pads. (You could use any non-porous surface, such as a large clear block or a piece of acetate, but by using the ink pads, you don't have to clean up when you're done; just close the pad.) I dipped my Aqua Painter in one of the colors and brushed the ink across the paper, using fairly quick and steady strokes and picking up more ink as needed. For the sky, I first applied Soft Sky ink at the horizon line. Then I blended that with Pool Party, moving up the image.
After the piece dried a bit, I decided it needed one more detail, so I stamped the image of the birds from Up, Up & Away between two of the trees. I trimmed the panel, adhered it behind the frame, and then used Dimensionals to attach it to the Soft Suede card base, which I had already stamped with the Hardwood background. I thought about adding some linen thread or another embellishment, but I decided I liked it just the way it was, and I hope the recipient did, too!
Thanks for stopping by!
Wednesday, April 15, 2015
Matchbook teabag holders ... and we love DS!
At Stampin' Up! we have a wonderful group of customer service agents, Demonstrator Support (DS). They answer our questions, fix our mistakes, listen to feedback, and resolve many problems, all with a friendly, helpful attitude. To show how much we love DS, we are celebrating Demonstrator Support Appreciation Week from April 13 - 17. It's a chance for us to call, e-mail, post, and Tweet (#weloveDS #stampinup) our thanks to this group of awesome men and women.
I missed DS Appreciation Week last year, so I wanted to make sure I participated this year. Many demonstrators send packages with candy and other sweet treats, so I wanted to send something a little different -- and something that was relatively flat and easy to pack in a box. I decided to make these cute matchbook-style holders with teabags inside.
Supplies (all Stampin' Up! except "Other"):
Stamps: Tea Shoppe, Patterned Occasions
Paper: Bashful Blue, Pale Plum, Barely Banana, Blushing Bride, Certainly Celery, Apricot Appeal, Bordering Blue, Peach Parfait, Basic Gray, Chocolate Chip, Whisper White card stock
Ink: Bashful Blue, Pale Plum, Barely Banana, Blushing Bride, Certainly Celery, Apricot Appeal, Bordering Blue, Peach Parfait, Basic Gray, Chocolate Chip
Accessories: Postage Stamp punch, 1-3/8" square punch, Chocolate Chip taffeta ribbon, Basic Gray taffeta ribbon, Simply Scored tool, Mono Multi liquid glue, Dimensionals, Glue Dots
Other: Stapler, individually wrapped teabags
I used eight different colors of card stock for the holders -- eight matchbooks in seven of the colors and four in the eighth -- with accents of Chocolate Chip and Basic Gray. All of the main colors except Blushing Bride are retired, and I had fun digging into my stash of older card stock.
These were actually fairly easy to put together; I made sixty of them over the course of one afternoon/evening and the following morning, and that was with a boo-boo. (I had cut out all of the pieces of card stock and scored half of them when I realized that I was scoring them in the wrong spot. Grr. So I re-cut those pieces and started over.) The most time-intensive parts were stamping the focal image (I used markers to make the image two different colors) and tying the ribbons.
Here is a quick tutorial for the matchbook teabag holders:
1. Cut your card stock to 2-3/4" x 8-1/2". You can make four matchbooks with one sheet of 8-1/2" x 11" card stock.
2. Score the card stock at 3-1/2" and 7-1/2". Fold on the score lines so the small flap is over the large one.
3. Place a staple in the middle of the small flap to keep it closed. Be careful not to staple through the large flap as well.
4. Stamp and/or embellish the front cover (large flap) of the matchbook. You could also stamp or write a message inside the cover.
5. Cut a 10" piece of ribbon. Wrap the ribbon around the small flap to hide the staple, tie a knot, and trim the ends. If desired, secure the knot to the matchbook with a Glue Dot.
6. Open the matchbook and slide a teabag under the small flap. If desired, use a Glue Dot to secure the teabag. (I chose to do this since I was shipping the holders, but if you are hand-delivering them or tucking one into a gift bag, you probably wouldn't need the extra adhesive.)
7. Tuck the large flap back under the small flap and present to the recipient.
You could easily adjust these matchbook holders for other treats (e.g., Ghirardelli chocolate squares, instant cocoa packets, a gift card, etc.). Just determine the width of your matchbook holder and where the score lines should be, remembering that the top flap needs to be long enough to tuck under the bottom flap.
I hope the DS agents enjoy all the treats, cards, and messages they receive this week and know how much they are appreciated. We love DS!
Thanks for stopping by!
I missed DS Appreciation Week last year, so I wanted to make sure I participated this year. Many demonstrators send packages with candy and other sweet treats, so I wanted to send something a little different -- and something that was relatively flat and easy to pack in a box. I decided to make these cute matchbook-style holders with teabags inside.
Supplies (all Stampin' Up! except "Other"):
Stamps: Tea Shoppe, Patterned Occasions
Paper: Bashful Blue, Pale Plum, Barely Banana, Blushing Bride, Certainly Celery, Apricot Appeal, Bordering Blue, Peach Parfait, Basic Gray, Chocolate Chip, Whisper White card stock
Ink: Bashful Blue, Pale Plum, Barely Banana, Blushing Bride, Certainly Celery, Apricot Appeal, Bordering Blue, Peach Parfait, Basic Gray, Chocolate Chip
Accessories: Postage Stamp punch, 1-3/8" square punch, Chocolate Chip taffeta ribbon, Basic Gray taffeta ribbon, Simply Scored tool, Mono Multi liquid glue, Dimensionals, Glue Dots
Other: Stapler, individually wrapped teabags
I used eight different colors of card stock for the holders -- eight matchbooks in seven of the colors and four in the eighth -- with accents of Chocolate Chip and Basic Gray. All of the main colors except Blushing Bride are retired, and I had fun digging into my stash of older card stock.
These were actually fairly easy to put together; I made sixty of them over the course of one afternoon/evening and the following morning, and that was with a boo-boo. (I had cut out all of the pieces of card stock and scored half of them when I realized that I was scoring them in the wrong spot. Grr. So I re-cut those pieces and started over.) The most time-intensive parts were stamping the focal image (I used markers to make the image two different colors) and tying the ribbons.
Here is a quick tutorial for the matchbook teabag holders:
1. Cut your card stock to 2-3/4" x 8-1/2". You can make four matchbooks with one sheet of 8-1/2" x 11" card stock.
2. Score the card stock at 3-1/2" and 7-1/2". Fold on the score lines so the small flap is over the large one.
3. Place a staple in the middle of the small flap to keep it closed. Be careful not to staple through the large flap as well.
4. Stamp and/or embellish the front cover (large flap) of the matchbook. You could also stamp or write a message inside the cover.
5. Cut a 10" piece of ribbon. Wrap the ribbon around the small flap to hide the staple, tie a knot, and trim the ends. If desired, secure the knot to the matchbook with a Glue Dot.
6. Open the matchbook and slide a teabag under the small flap. If desired, use a Glue Dot to secure the teabag. (I chose to do this since I was shipping the holders, but if you are hand-delivering them or tucking one into a gift bag, you probably wouldn't need the extra adhesive.)
7. Tuck the large flap back under the small flap and present to the recipient.
You could easily adjust these matchbook holders for other treats (e.g., Ghirardelli chocolate squares, instant cocoa packets, a gift card, etc.). Just determine the width of your matchbook holder and where the score lines should be, remembering that the top flap needs to be long enough to tuck under the bottom flap.
I hope the DS agents enjoy all the treats, cards, and messages they receive this week and know how much they are appreciated. We love DS!
Thanks for stopping by!
Subscribe to:
Posts (Atom)