Before Christmas I ordered a few items from the upcoming Occasions catalog from Stampin' Up! The first things I've had a chance to try out are the From the Garden stamp set and Handpicked Framelits dies. Here are my first three creations:
Supplies (all Stampin' Up!):
Stamps: From the Garden
Paper: Soft Sky, Baked Brown Sugar, Real Red, Strawberry Slush, Whisper White, Old Olive, Daffodil Delight card stock
Ink: Old Olive, Memento Tuxedo Black
Accessories: Handpicked Framelits dies, Cupcake Builder punch, 1-3/8" circle punch, Itty Bitty Accents punch pack, Glue Dots, Dimensionals
I think this is a cute, simple, nontraditional Valentine's Day card. It would also be perfect for anytime you want to say love you, thinking of you or miss you. It's a pretty straightforward card, so there isn't much to explain. The only detail that isn't evident is that the leaves on the stem/vine image are actually just outlines. After I stamped the stems with Old Olive ink, I used an Old Olive marker to fill in the leaves to make them a little more bold.
Supplies (all Stampin' Up!):
Stamps: From the Garden
Paper: Marina Mist, Whisper White card stock
Ink: Memento Tuxedo Black, Marina Mist, Wild Wasabi, Basic Black marker
Accessories: Scalloped Tag Topper punch, pearls, burlap ribbon, Glue Dots, Dimensionals
I wanted to make this card using just the stamp set, without the coordinating Framelits dies. The images in the stamp set are all fairly small, so I stamped the flowers and leaves together in groups to make them a better scale for the card. I cut out the flower on the bottom left corner by hand, adhered it to the tag with a Dimensional and added a pearl in the center. For the tassel on the tag, I cut a piece of burlap ribbon a few inches long, trimmed off one of the sewn edges and then pulled out a few of the individual fibers. I threaded some of the fibers through the hole on the tag and used one of the fibers to tie them together. I made a dotted border around the tag with a marker and added a horizontal line of pearls to balance out the vertical tag.
Supplies (all Stampin' Up!):
Stamps: From the Garden, Work of Art, Endless Birthday Wishes
Paper: Whisper White, Basic Black, Pear Pizzazz, Old Olive, Daffodil Delight, Crushed Curry, Coastal Cabana, Bermuda Bay, Pumpkin Pie, Tangelo Twist card stock; silver glimmer paper
Ink: Pear Pizzazz, Daffodil Delight, Pumpkin Pie, Coastal Cabana, Memento Tuxedo Black, Project Life Journaling Pen (05)
Accessories: Handpicked Framelits dies, Itty Bitty Accents punch pack, Glue Dots, Mono Multi liquid glue, Dimensionals
This is my favorite card of the three, and probably the most unexpected, since there is nothing garden-ish about it. As soon as I saw the shape of the die that's meant to be a long plant stake, pointed at one end, I thought of a crayon.
I chose four colors and then selected a light and dark shade of each color; the lighter shade is the crayon, and the darker shade is the wrapper. I die cut the crayon shape from each of those eight colors of card stock and then trimmed off the ends of the four darker pieces. I stamped the "loopy" image from the From the Garden at each end of the wrapper piece and used a journaling pen to draw a solid line next to it. Then on the center of each crayon I stamped a different sentiment. All of the sentiments are from From the Garden, although "for you" is shortened from "Fresh picked for you"; the photopolymer makes it really easy to stamp just part of an image exactly where you want it. After I glued the wrappers on the crayons, I trimmed the bottom end of each crayon so they weren't quite so rounded.
With the crayons made, I needed a background. The swooshes and dots in the Work of Art set seemed like perfect crayon scribbles, so I stamped them randomly on Whisper White card stock using the same colors as the crayons. I stamped a birthday sentiment, mounted the panel on a Basic Black card base, adhered the crayons and added a few silver stars.
There you have it: three very different cards made with the same basic products. I'm excited to see what else I'll create with this stamp set and dies. Thanks for stopping by!
Tuesday, December 30, 2014
Monday, December 29, 2014
Lego winter village 2014
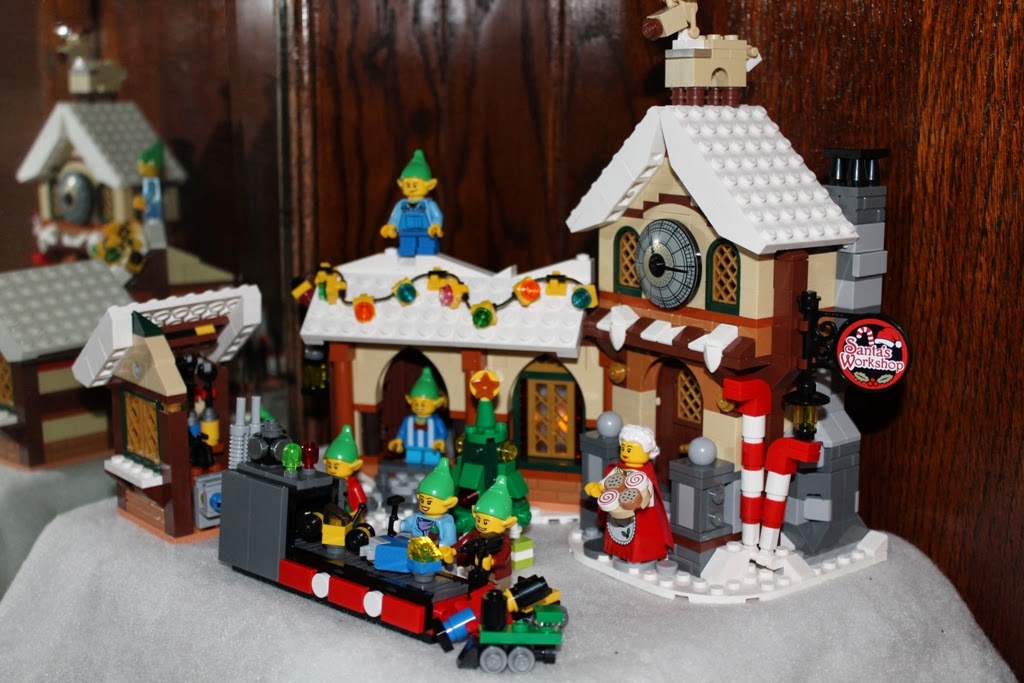
You may remember Snowburg, my Lego winter village, from last Christmas. The village was resurrected again this year with a few changes: it has been relocated to higher ground (i.e., our built-in buffet) to avoid further attacks from the abominable snow cat, and it has expanded to include a Parisian cafe (the town council wants to bring in more tourist dollars), a bakery, a Christmas tree lot, Santa's workshop, and a busy, busy town square filled with people ice skating, having snowball fights, mailing letters to Santa and generally enjoying the holiday spirit. Snowburg is definitely a bustling place this time of year!
I also had a lot of fun this season with the Lego City Advent calendar, which I got from my parents at the beginning of December. Each morning I opened the little door for that day, assembled the figure or accessory inside, and added it to my winter village.
You'll notice in these photos that Santa is with his sleigh by his workshop and also on top the Parisian cafe. No worries. The Santa by the workshop is, in fact, the real Santa. The one on the cafe is Santa's little-known younger brother, Klaus Claus, who acts as Santa's stunt double (sliding down chimneys is dangerous work!) and runner up to the position of Jolly St. Nick. If, for any reason, Santa is unable to perform his Christmas duties, then Klaus steps in. He has to be ready to go at a moment's notice, hence the second sleigh.
There are a few of "Santa's helpers" wandering around the village, too. Everyone wants to spread Christmas joy!
I hope you're having a splendid holiday season. Thanks for stopping by!
I also had a lot of fun this season with the Lego City Advent calendar, which I got from my parents at the beginning of December. Each morning I opened the little door for that day, assembled the figure or accessory inside, and added it to my winter village.
You'll notice in these photos that Santa is with his sleigh by his workshop and also on top the Parisian cafe. No worries. The Santa by the workshop is, in fact, the real Santa. The one on the cafe is Santa's little-known younger brother, Klaus Claus, who acts as Santa's stunt double (sliding down chimneys is dangerous work!) and runner up to the position of Jolly St. Nick. If, for any reason, Santa is unable to perform his Christmas duties, then Klaus steps in. He has to be ready to go at a moment's notice, hence the second sleigh.
There are a few of "Santa's helpers" wandering around the village, too. Everyone wants to spread Christmas joy!
I hope you're having a splendid holiday season. Thanks for stopping by!
Thursday, December 25, 2014
Merry Christmas
"There are many things from which I might have derived good, by which I have not profited, I dare say," returned the nephew. "Christmas among the rest. But I am sure I have always thought of Christmas time, when it has come round -- apart from the veneration due to its sacred name and origin, if anything belonging to it can be apart from that -- as a good time; a kind, forgiving, charitable, pleasant time; the only time I know of, in the long calendar of the year, when men and women seem by one consent to open their shut-up hearts freely, and to think of people below them as if they really were fellow-passengers to the grave, and not another race of creatures bound on other journeys. And therefore, uncle, though it has never put a scrap of gold or silver in my pocket, I believe that it has done me good, and will do me good; and I say, God bless it!"
--Charles Dickens, A Christmas Carol
Wishing you a Christmas and new year filled with love, laughter and peace.
--Charles Dickens, A Christmas Carol
Wishing you a Christmas and new year filled with love, laughter and peace.
Wednesday, December 24, 2014
Last-minute Christmas ornaments
So in my last post I mentioned that I was done with all my Christmas preparations. And that was true; I was done. Promise. At least it was true until I found out that I needed to make last-minute changes to a couple of presents (technically one was a birthday present, but the celebration is on Christmas, so it's close enough). I took care of that yesterday morning -- while avoiding anything resembling a mall or department store -- and then after finishing another project in the afternoon I decided that what I really needed to do was make last-minute Christmas ornaments. Did I have time for that? Not really. But did I have fun making them anyway? Yep. And here they are:
Supplies (all Stampin' Up! unless otherwise noted):
Stamps: Bright and Beautiful
Paper: Silver paper (retired); kraft, Naturals White card stock
Ink: Silver pigment (ColorBox)
Accessories: Burlap Fabricpage (Canvas Corp), Stars Framelits dies, Frosted Finishes embellishments, Vintage Faceted Buttons, large pearls, silver detail embossing powder, silver elastic cord, Eclectic Paper-Piercing Pack, paper-piercing tool, 3-in-1 Advanced Craft Glue (Beacon), Scor-Tape (Scor-Pal), Dimensionals
I made ten ornaments total; one to keep and nine for family members. That's a lot of die-cut stars to crank out through the Big Shot machine.
I used the three largest star-shaped Framelits dies: the largest for the silver paper, the next size for the burlap and the backing (see below), and the third-largest for the stamped image. I was worried at first that I would run out of the burlap. I had one 12" x 12" page, but when I cut out the first star, I discovered that it was actually two sheets of burlap sewn together, so I just separated each pair of stars after cutting them out.
I also made a discovery about the kraft card stock: It has a "right" side and a "wrong" side. If you look really closely at the card stock, you'll notice very faint lines on the back. It's barely noticeable, and wouldn't made a difference if you were using the card stock for a mat or a die-cut or punched accent. It may even be okay for basic stamping. But when I started to emboss the stars, the images that I had stamped on the back of the card stock did not look right. I think the detail embossing powder might have settled into those faint lines. At any rate, they just looked a little strange, so I stamped and embossed those stars over again.
I only had seven of the Frosted Finishes embellishments left from last year, so for the last three stars, I used a large Vintage Faceted Button. I added a large pearl to the center of the button to give it a more finished look, but I really wish I had some large rhinestones to add to the shine. I did glue the pearls into the buttons to make them a little more secure.
The three layers are attached together with Dimensionals. I wasn't sure how well the Dimensionals would adhere to the burlap, so I tested a little scrap first. They seem pretty secure for now; I guess we'll find out next year how well they stand the test of time.
I also pierced a border along the edge of the largest star shape of each ornament. Without the paper piercing, the silver paper looked too flat and boring compared to the texture of the burlap and embossed layers.
I wanted to attach a string to the ornaments without punching a hole in one of the points. My solution was to cut a piece of silver elastic cord and use Scor-Tape to adhere the ends (untied) to the back of the largest star at one of the points. Then I cut a piece of Naturals White card stock with the second-largest star die -- I used the smaller size for the backing star so it wouldn't cover up the pierced holes -- stamped and signed it, and adhered it to the large star, securing the ends of the cord. (This is actually easier to do before you add the layers on the front.) The backing star also makes the ornament a little sturdier, since the silver paper isn't as heavy as card stock.
I already have my ornament on my Christmas tree and the other nine packaged up and ready to deliver. So I think now I'd really done with all the Christmas preparations. Just in the nick of time. Thanks for stopping by!
Supplies (all Stampin' Up! unless otherwise noted):
Stamps: Bright and Beautiful
Paper: Silver paper (retired); kraft, Naturals White card stock
Ink: Silver pigment (ColorBox)
Accessories: Burlap Fabricpage (Canvas Corp), Stars Framelits dies, Frosted Finishes embellishments, Vintage Faceted Buttons, large pearls, silver detail embossing powder, silver elastic cord, Eclectic Paper-Piercing Pack, paper-piercing tool, 3-in-1 Advanced Craft Glue (Beacon), Scor-Tape (Scor-Pal), Dimensionals
I made ten ornaments total; one to keep and nine for family members. That's a lot of die-cut stars to crank out through the Big Shot machine.
I used the three largest star-shaped Framelits dies: the largest for the silver paper, the next size for the burlap and the backing (see below), and the third-largest for the stamped image. I was worried at first that I would run out of the burlap. I had one 12" x 12" page, but when I cut out the first star, I discovered that it was actually two sheets of burlap sewn together, so I just separated each pair of stars after cutting them out.
I also made a discovery about the kraft card stock: It has a "right" side and a "wrong" side. If you look really closely at the card stock, you'll notice very faint lines on the back. It's barely noticeable, and wouldn't made a difference if you were using the card stock for a mat or a die-cut or punched accent. It may even be okay for basic stamping. But when I started to emboss the stars, the images that I had stamped on the back of the card stock did not look right. I think the detail embossing powder might have settled into those faint lines. At any rate, they just looked a little strange, so I stamped and embossed those stars over again.
I only had seven of the Frosted Finishes embellishments left from last year, so for the last three stars, I used a large Vintage Faceted Button. I added a large pearl to the center of the button to give it a more finished look, but I really wish I had some large rhinestones to add to the shine. I did glue the pearls into the buttons to make them a little more secure.
The three layers are attached together with Dimensionals. I wasn't sure how well the Dimensionals would adhere to the burlap, so I tested a little scrap first. They seem pretty secure for now; I guess we'll find out next year how well they stand the test of time.
I also pierced a border along the edge of the largest star shape of each ornament. Without the paper piercing, the silver paper looked too flat and boring compared to the texture of the burlap and embossed layers.
I wanted to attach a string to the ornaments without punching a hole in one of the points. My solution was to cut a piece of silver elastic cord and use Scor-Tape to adhere the ends (untied) to the back of the largest star at one of the points. Then I cut a piece of Naturals White card stock with the second-largest star die -- I used the smaller size for the backing star so it wouldn't cover up the pierced holes -- stamped and signed it, and adhered it to the large star, securing the ends of the cord. (This is actually easier to do before you add the layers on the front.) The backing star also makes the ornament a little sturdier, since the silver paper isn't as heavy as card stock.
I already have my ornament on my Christmas tree and the other nine packaged up and ready to deliver. So I think now I'd really done with all the Christmas preparations. Just in the nick of time. Thanks for stopping by!
Saturday, December 20, 2014
Clean and simple all-occasion card
I can't believe Christmas is only a few days away. All my cards are mailed, my shopping is finished, and the presents are wrapped. But if you're still busy with preparations, here's a quick all-occasion card to give you a break from the holiday hoopla:
Supplies (all Stampin' Up! unless otherwise noted):
Stamps: Gorgeous Grunge, Happiest Birthday Wishes
Paper: Crumb Cake, Perfect Plum card stock; First Edition Specialty Designer Series Paper (DSP)
Ink: Perfect Plum, Old Olive, Crub Cake
Accessories: Botanical Branch Embosslits die (Sizzix), Regals Candy Dots, Dimensionals
I started with a Crumb Cake card base and stamped one of the splatter images from Gorgeous Grunge. I used Crumb Cake card stock to make the embossed die-cut flower and then colored the embossed parts with Perfect Plum and Old Olive markers. I added a Perfect Plum Candy Dot to the center of two of the flowers, although I think I should have used Very Vanilla, or maybe even Crumb Cake for more contrast. What do you think?
To create a simple background for the flower I cut a strip of First Edition Specialty DSP and stamped it with the splatter image in Crumb Cake ink (I stamped on scratch paper first to lighten the ink color). I matted the DSP with Perfect Plum card stock and adhered the panel to the left side of a Crumb Cake card base. Using Dimensionals, I attached the flower to the DSP. I added a "happy birthday" sentiment, but this card could easily be used for just about any occasion.
Thanks for stopping by!
Stamps: Gorgeous Grunge, Happiest Birthday Wishes
Paper: Crumb Cake, Perfect Plum card stock; First Edition Specialty Designer Series Paper (DSP)
Ink: Perfect Plum, Old Olive, Crub Cake
Accessories: Botanical Branch Embosslits die (Sizzix), Regals Candy Dots, Dimensionals
I started with a Crumb Cake card base and stamped one of the splatter images from Gorgeous Grunge. I used Crumb Cake card stock to make the embossed die-cut flower and then colored the embossed parts with Perfect Plum and Old Olive markers. I added a Perfect Plum Candy Dot to the center of two of the flowers, although I think I should have used Very Vanilla, or maybe even Crumb Cake for more contrast. What do you think?
To create a simple background for the flower I cut a strip of First Edition Specialty DSP and stamped it with the splatter image in Crumb Cake ink (I stamped on scratch paper first to lighten the ink color). I matted the DSP with Perfect Plum card stock and adhered the panel to the left side of a Crumb Cake card base. Using Dimensionals, I attached the flower to the DSP. I added a "happy birthday" sentiment, but this card could easily be used for just about any occasion.
Thanks for stopping by!
Subscribe to:
Posts (Atom)