I'm back today with a few more two-at-a-time cards. As I mentioned in my last post, during August, I was working on card collections for friends. When I got out a stamp set to make a card for one friend, I tried to also make a card for the other friend (or one for my stash). Today's cards are ones you could use for almost any occasion by just changing the sentiment.
Saturday, September 21, 2024
Two-at-a-time all-occasion cards
Saturday, September 14, 2024
Two-at-a-time birthday cards
Whew! The start of the school year and going back to work has really thrown me off my game. I haven't gotten back into a good routine yet; I need to figure out how to fit in crafting/relaxing/fun time with work, sleep, and all the boring regular stuff like cleaning and laundry. So I don't think I'll be posting as much as I did in August, but I'll try to get back on track with sharing something at least once a week. Today I've got a few festive birthday cards for you.
During August I was working on a collection of birthday cards to gift to a friend. So when I made a card for her, I tried to make another one for my own stash. For these two-at-a-time cards I used the Pretty Party Decor stamp set (Trinity Stamps) with the Paradise Found collection of inks (Catherine Pooler). I wanted to use a gender-neutral color pallet, and I think these colors fit the bill.
Each lantern image has two stamps: the full shape of the lantern and then the details. I stamped the full image onto scratch paper first and then onto my card layer to make it lighter; the detail image is stamped in the same color but "full strength." I used a ruler and fine-tip pen to add the strings for the lanterns, and I also added a little sparkle by coloring the lighter parts of the lanterns with a Stardust Gelly Roll pen. It doesn't show up well, but you can see a hint of it in this photo:
I layered the panels on black card bases and finished them off with yellow enamel dots.
For these cards I used the Make a Wish stamp and die combo (Taylored Expressions). I had this layout in my head (not that it's a unique layout or anything), and while the cards turned out fine, I don't totally love them. For the first card (on the left), I adhered the die-cut candle and flame images directly to the card base. I used a small blender brush to add a touch of yellow ink behind each flame to create a glow. For the second card, I attached all the candles and flames to the card base with foam tape. I like that better, but it still wasn't exactly what I was looking for. I think maybe I should have stamped the candles and flames on colored card stock so there wasn't so much white. Or I could have lightly blended over the die-cut image with the same color ink. Oh, well. Two things to try next time. At any rate, I stamped "Happy Birthday!" along the bottom of the cards and finished them with clear sequins or blue rhinestones.
Thanks for stopping by!
Saturday, August 31, 2024
Backyard flowers 2024
I’m finishing August by taking a quick break from cards to share some of the amazing flowers we’ve had in our backyard the past few months. Some are things we planted or knew were there from previous years, though even some of those have gone crazy with all the rain we’ve had. Others are plants or blooms we haven’t seen in the almost three years we’ve lived here. And I’m sure some are technically weeds, but if it’s pretty, I don’t care. It’s been a wild summer, and I love how green everything has been (although I don’t love the water in our basement or having to mow the yard so often).
Note: I know or have figured out the names of many of these flowers, but I’m not going to put them in now for time’s sake. I may come back later and add them in. For now, here are lots of pictures!
Thanks for stopping by!
Tuesday, August 27, 2024
August Christmas cards: Happiest holidays
We've had a lot of heat and humidity lately, so it feels a little weird to make holiday cards with snowflakes. But I know that fall is right around the corner, and winter will be right on its heels, so I need to keep the Christmas cards coming. Here is this month's design:
One of my goals with these cards was to use a few things I hadn't used before. I managed to do that and also use a few older items that aren't in frequent rotation. As it turns out, almost everything I used on these cards was from a different company, and for some reason that makes me extra happy. Here are the supplies:
- Brilliant Blue and Ballet Blue ink and card stock (Stampin' Up!)
- Sugar Cube ink (Taylored Expressions)
- Snowflake background (Stamp Oasis)
- Jumbo Snowflake die (Erin Lee Creative)
- Snowflake Set #1 dies (Echo Park)
- Happiness stamps and dies (Honey Bee Stamps)
- Inside Greetings - Holiday (Sunny Studio) -- For the sentiment inside the cards.
- Blue rhinestones (HAI)
- Iridescent shimmer spray (Altenew)
I think most of the card design is self-explanatory, but I'll point out a few things that might be hard to notice in the pictures. First, the word "happiest" is die cut twice for each card (from Brilliant Blue card stock). I layered the pieces together before gluing them on the cards. Actually, it's two separate dies ("happ" and "iest") because the set comes with different pieces so you can make different words, like "happy," "happiness," etc. I used a blue rhinestone for the dot on the "i."
Second, the white snowflakes are only glued down in the center. I like that they curl up just a bit for a little dimension. Part of the reason they do that is because I sprayed them with iridescent shimmer mist, which the third hard-to-see detail. It's a little better in this photo:
And that's it for my August Christmas cards. I should make a preliminary Christmas card list to get an estimate of how many cards I'll need. I'll probably do one more batch next month, but I'm not sure how many more I'll need after that.
Thanks for stopping by!
Monday, August 26, 2024
Underwater gel print scenes
The batch of cards I'm sharing today was definitely the most time-consuming of the gel-print cards I made this time around. But I think they were worth the effort.
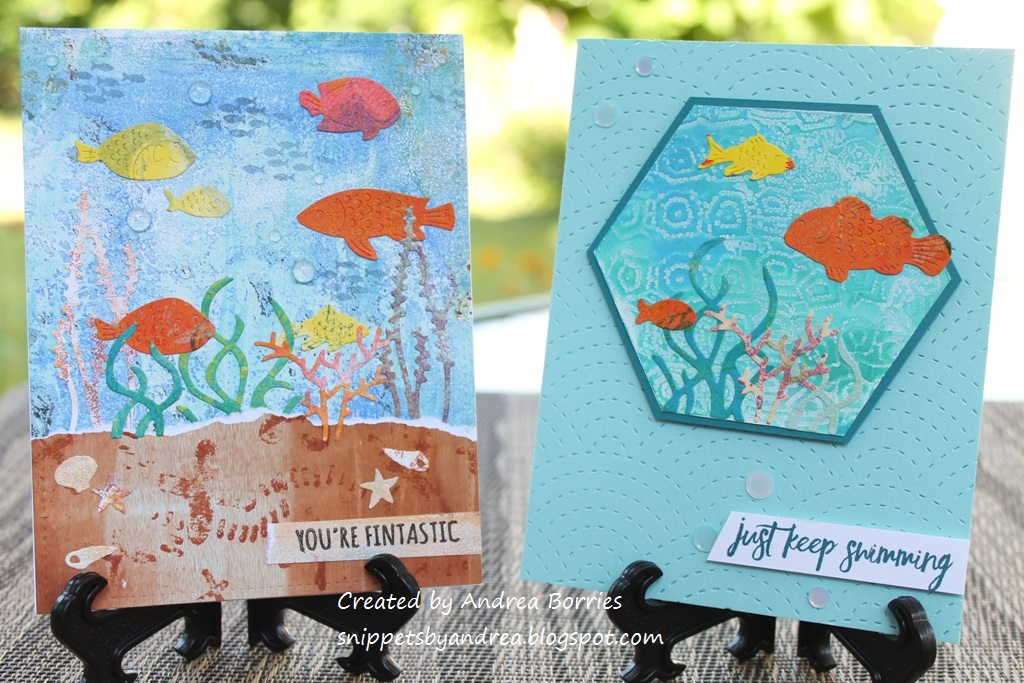
For these cards, I used various gel prints to make all the parts of the underwater scenes. I chose one main print for the background/water for each card, cut it with a stitched rectangle die, and adhered it to a white card base. To create the sand I tore a brown gel print into wide strips and cut the bottom and sides of each stripe with the stitched rectangle die so it would match the stitching on the background. Then I used bits and pieces left over from a variety of other gel prints to create fish, kelp, coral, and seashells with the School of Fish die (Memory Box) and the Build-a-Scene - Underwater dies (Taylored Expressions). I even used a gel print to make the sentiment strip. I played around until I was happy with the arrangement and then glued everything down. I finished with some sequins to create the look of bubbles.
I don't usually stamp directly on the gel prints because they have a rough texture. But I wanted to stamp some little schools of fish in the background to add more depth. I tried Distress Oxide inks (Faded Jeans and Broken China) and VersaFine (Onyx Black). All of the inks worked, but I did notice that the images stamped with Distress Oxides got sort of blurry as they dried, as if the ink was bleeding. Luckily that was fine for these cards -- it's sort of an underwater effect, which is perfect.
I made one more card like the first two, although I did change the sentiment, and then I tried a different card layout. I have a set of small, shaped gel presses, and one of them is a hexagon. I had a hexagon print that looked like it would make a good underwater scene, so I trimmed off the extra paper, matted it with blue-green card stock, and then trimmed down the mat. I added the die-cut pieces and set the piece aside to work on the card base. I chose light aqua card stock and die cut the card front with the Fanfare Cutting Plate (Taylored Expressions) on the card front. The pattern reminds me of scales or waves, and I think it adds a nice, subtle detail. I used foam tape to attach the focal piece and a sentiment strip, and I finished the card with clear sequins.
Thanks for stopping by!