Saturday, October 1, 2022

September Christmas cards: Fun with patterned paper

I know I'm a day late posting my September Christmas cards. Last month was a total blur. I ended up getting a job in an elementary school at the beginning of the month, worked two days, and got COVID. Sigh. I was out for a week, went back and felt like I was starting all over. And there were issues with the school district's payroll and HR departments getting me (and other new employees) set up so I can actually get paid. With all that and other life stuff, September felt like one big struggle. I didn't get a single blog post done -- and I had been on such a roll in August! Oh, well.

Back to the important part of this post: Christmas cards. I didn't have a lot of physical or creative energy in September, so for this batch of Christmas cards I decided to finish up a pack of 6" x 6" patterned paper that I've had for quite awhile: Christmas on Market Street from My Mind's Eye.

I had about half of the paper pad left, so I started by cutting most of the sheets into card front-sized panels and accent strips. I mixed and matched patterns and then glued the papers to card bases in a variety of coordinating colors. I used several different holiday-themed word dies for the sentiments and decorated the cards with various trims and sequins.

These types of cards are always ones that I expect to finish quickly -- and yet that's never how it works out. I hem and haw about the layout, colors, embellishments, etc. So even though these look like quick and easy cards, I spent a lot of time on them.

For this last group of cards, I used the leftover paper pieces to cut strips, squares, and trees for some different layouts. The top two cards are 6" x 6" instead of A2 size, so they will need extra postage (or hand delivery). I think my favorite cards from this whole group are the cards with the group of three trees.

Thanks so much for stopping by. It happens to be World Card Making Day today (Oct. 1), so I hope you have some time to get crafty!


Wednesday, August 31, 2022

You're a fungi

I've got one last challenge card to post for August. Whew! It's been years since I've done so many blog posts in one month! This card is my second one for the August challenge at Stay Crafty with a Blog Named Hero. The theme is "It's Hip to Be Square," and each project needs to include a square(s) in some way. For this card, I went with a clean and simple masculine design.

Supplies:
Stamps: You're a Fungi (Hero Arts)
Paper: Stone woodgrain card stock (Hero Arts); Mossy Meadow, Soft Suede card stock (Stampin' Up!)
Ink: Versamark (Tsukineko)
Accessories: White embossing powder (Hero Arts), Neutrals Candy Dots (Stampin' Up!), 1-1/4" square punch (Stampin' Up!), foam tape (3M)

I wanted to use a neutral color palette, so for the card base I chose a piece of gray woodgrain card stock from an old My Monthly Hero kit. I could have cut the piece in half to make two card fronts, but I decided to score and fold it and use the whole piece for the card base. (Since this is a simple card, I like the extra detail of the woodgrain texture, and it's nice to feel it on the back of the card, too. Makes it seem a little more special.)

I love all the images and punny sentiments in the You're a Fungi stamp set, so I started by figuring out which of the mushrooms would fit in a 1-1/4" square and stamping them on a deep green card stock with Versamark ink. For some of the bitty mushrooms I was able to just fit two of them in one square. I embossed the images with white embossing powder and punched them out. (My embossing is not great. I know all the tips and tricks, but I often still struggle with it, which is one of the reasons I don't do it often. Luckily the rustic feel of this card means the imperfect embossing isn't too big a deal.)

I wanted to include the "you're a fungi!" sentiment, but it was too long to fit in one of the squares. I fixed that by stamping the sentiment in two steps. First I inked up just the "you're a" with Versamark and then stamped it on brown card stock. I cleaned off the stamp and then inked and stamped "fungi!" just below the first part of the sentiment. Then I embossed it and punched it out. Problem solved! And I love how it stands out on the different color of card stock.

I arranged the six squares in the center of the card base and attached them with foam tape. (The gap between the squares is about 1/4".) To finish the card I added three gray enamel dots in the upper left corner. I really like how they add just a little more interest, but since they're the same color as the background, they don't distract from the stamped images.

I'd forgotten how fun it is to do challenges -- maybe I'll try to keep it up and enter again next month. Thanks for stopping by!


Autumn bouquet

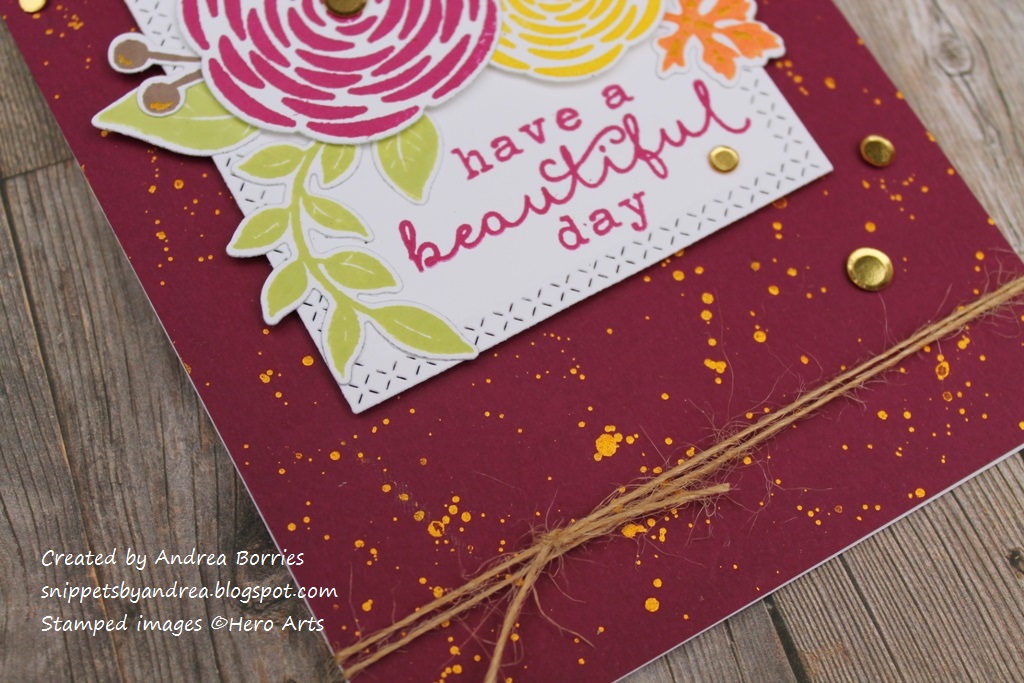
The last two cards I have to share this month are both for the August challenge at Stay Crafty with a Blog Named Hero, but I'm going to post them separately. The theme for the challenge is "It's Hip to Be Square," and projects need to include a square or squares in some way. I've been into fall-themed crafting the past couple of weeks, so for this first challenge card I created a bouquet with an autumn feel.

Supplies:
Stamps: You're So Lovely (Hero Arts)
Paper: Plum card stock (Hero Arts), Basic White card stock (Stampin' Up!)
Ink: Lime Green, Moss, Lemon Drop, Raspberry Jam, Grape Juice, Tangerine, Cup O' Joe (Hero Arts); gold Glimmer Metallic ink (Hero Arts)
Accessories: You're So Lovely dies (Hero Arts), Nested Squares Cross-Stitch dies (Rubbernecker Stamps), gold confetti (Pretty Pink Posh), hemp twine (May Arts Ribbon), foam tape (3M)

I started out by stamping and die cutting all of the flowers and leaves (I cut several of each piece so I could make a few cards at the same time) and the white square with the stitched border. I stamped the sentiment on the square and arranged the flowers and leaves around it, letting some of the pieces go past the edges of the square. I used foam tape to pop up the two flowers and add a little dimension.

For the background panel, I used a 4-1/4" x 5-1/2" piece of Plum card stock and splattered it with gold Glimmer Metallic ink. When using the metallic ink, I put a little bit on a clear block (most any nonporous surface would work; clear blocks are just handy while stamping) and add a drop or two of water. I mix it up with a small paintbrush and then use the brush to make the splatter. I may have overdone the splatter a little bit on this card, but I love the sparkle! I also wanted to tie in the metallic ink to the flowery focal panel, so I painted just a little bit onto the brown berries, the purple sprig, and the orange leaf.

Once the gold ink was dry, I used foam tape to attach the focal panel to the card base, leaving a border of about 5/8" on either side and 3/4" on the top. I added some gold confetti pieces around the focal panel and in the center of each flower. I adhered the whole card front to a white card base and finished off the card by wrapping a piece of help twine twice around the front of the card and tying it in a knot.

I love how this card turned out, and since I added a birthday sentiment inside, I've got another birthday card for my stash! Stay tuned for my second "square" card in my next post.

Thanks for stopping by!


Monday, August 29, 2022

Autumn wreath

The second card in my series of challenge entries is for Art Impressions' Dynamic Duo challenge, where the requirement was to create something using at least two stamp or die sets. I used four watercolor sets to create a pretty autumn wreath.

Supplies:
Stamps: 4701 - Clay Pot, 4052 - Flower Set, 4868 - Watercolor Flower Set 2, 4607 - Flowering Mailbox (Art Impressions)
Paper: Watercolor paper (Strathmore); Soft Suede, Crumb Cake card stock (Stampin' Up!)
Ink: Soft Suede, Old Olive, Crushed Curry, Cajun Craze (Stampin' Up!); Metallic Accents paint (Art Philosophy)
Accessories: Hello die (Lawn Fawn), Brushed Metallic Adhesive Backed Dots (Stampin' Up!), hemp twine (May Arts Ribbon), Art Glitter Glue (Art Institute Glitter)

I haven't done any watercolor stamping in quite awhile, and I've gotten a little rusty. When I sat down to work on this card, I originally tried to create a whole little scene. That turned out to be too overwhelming (and too much pressure since I was trying to work quickly), so I switched gears and decided to try a stamped wreath instead.

I started by using a pencil to lightly trace a circle on a piece of watercolor paper. I inked the branch image with brown ink and stamped it three times, overlapping each branch with the one before, before re-inking the stamp. This helps create depth and color variation. I repeated the process until I had worked my way all around the circle. Using a barely damp paint brush, I lightly tapped/dabbed the branches so the color spread a little and created a watercolor look.

I gave the branches a little time to dry and then moved on to the rust-colored flowers. (Or leaves. It is an autumn wreath, so they could be leaves, too.) I inked up the image and then stamped two or three times in a little cluster, re-inked the stamp and stamped another cluster, repeating until I was happy with the color distribution. Again, I used a slightly damp brush to dab at the images and spread the color. I let it dry a bit, then repeated with the green leaves and finished with the yellow flowers.

For a little sparkle I splattered the panel with some gold paint and added three gold enamel dots. I glued a twine bow on the wreath and added a die-cut sentiment at the bottom of the card. I layered the panel on a mat of Soft Suede card stock and then adhered it to a Crumb Cake card base.

I really love the way this card turned out (even though I still wish my watercolor stamping was a little better) and I may have to try some other seasonal wreaths.

Thanks for stopping by!


Thanksgiving sunflowers

Over the last week I decided to make cards for three different August challenges. (So that means I'll have several blog posts coming up!) The card I'm sharing in this post is my entry for the August 2022 Monthly Mix Challenge on the Gina K Designs blog, and the theme is "Adding Texture."

Supplies:
Stamps: Zenflowers (Gina K Designs)
Paper: Basic White, Crumb Cake, Night of Navy card stock (Stampin' Up!)
Ink: Memento Tuxedo Black (Tsukineko), colored pencils (Prismacolor)
Accessories: Art Deco and Harvest Flourish stencils (Gina K Designs), Zenflowers dies (Gina K Designs), Bee Pollen Dew Drops (Honey Bee Stamps), Connect Glue (Gina K Designs), foam tape (3M), Gamsol (Gamblin), paper blending stumps (Jack Richeson)

I bought the Zenflowers stamp set a couple of years ago when it was part of a monthly kit from Gina K Designs, but I hadn't used it yet. (I'm not sure how I manage that, but it happens more than I'd like.) So this challenge seemed like the perfect reason to get it out! I stamped, colored, and die cut two of the sunflower images as well as a few leaves. I used colored pencils and did some blending with Gamsol to add some depth to the images.

For the texture on my card, I used two stencils from Gina K Designs, but I used them with an embossing mat and my Big Shot machine to emboss the patterns instead of ink blending or using paste. I used the Harvest Flourish stencil to emboss the front of a Crumb Cake card base and the Art Deco stencil to emboss a wide strip of Night of Navy card stock. I glued the navy card stock to the card front (slightly to the left of the center) and then added the flowers (with foam tape) and leaves (with liquid glue).

I wanted to add a sentiment to the card, and "Happy Thanksgiving" was just about the perfect size. I stamped it on a strip of white card stock, trimmed the ends of the strip, and adhered it below the images, tucking it under one of the leaves and the bottom of the smaller flower. I finished off the card with three yellow droplets. 

Thanks for stopping by!