Sunday, January 6, 2019

2019 fun and funky desk calendar

Happy new year! Have you fully recovered from all the holiday hoopla? I'm getting there, and one of my goals for the new year is to get back to a regular blogging schedule, which I hope will be one post on the weekend and one post during the middle of the week. Ironically I'm going to deviate from that plan for my first post of the year because I'm actually going to do three posts today.

For Christmas I again made desk calendars for my sister and several friends. I made three different calendar designs: one with animals, one with quotes or sayings, and the one in this post, which I refer to as the fun and funky calendar. That would be a lot of photos for one post, so I'm posting each calendar separately. I'll include limited supply details in each post, but please leave a comment if you have additional questions. Now on to the fun!

Here are the supplies I used for all of the funky calendar pages: Tear-off calendar pages (Taylored Expressions); Oh My Stars Collection kit (Bella Blvd); Itty Bitty Elements stamp set (Pinkfresh Studio); Whisper White, Basic Black card stock (Stampin' Up!); Tuxedo Black ink pad (Memento): alcohol markers (various companies); Layering Circles Framelits dies, Stitched Shapes Framelits dies (Stampin' Up!); sparkling clear sequins (Pretty Pink Posh); Dimensionals (Stampin' Up!)


Thanks for stopping by!

Monday, December 31, 2018

Three birthday cards to finish the year

For my last post of 2018, I have -- surprise! -- more birthday cards to share. I feel like I post a lot of birthday cards, so I hope that doesn't get boring. But to be honest, that is the type of card I make and use the most, especially since I've also been making birthday cards for my mom and my uncle to use. All three of us give cards to many of the same relatives, so the cards have to be different.

But many of the birthday cards I make don't necessarily have to be for birthdays. Just change or omit the sentiment, and the card design could be used for almost any occasion. That's the case for the first two cards.

Supplies (all Stampin' Up! unless otherwise noted):
Stamps: Birthday Backgrounds, You're My Type
Paper: Smoky Slate, Basic Black, Whisper White, textured Bermuda Bay
Ink: Bermuda Bay, Memento Tuxedo Black, Smoky Slate
Accessories: Rounded Nesting Squares Quickutz (We R Memory Keepers), 3/4" circle punch, aqua dots (Close to My Heart), Dimensionals

I love the color scheme on this card - black and gray with pops of teal. You could make multiple versions of this card with different accent colors and sentiments for a great little card set.

To do something a little different with the sentiment, I inked the stamp once with Bermuda Bay and then stamped it three times, moving the stamp down just a bit each time.

The scallops blow the focal image are three 3/4" circles punched from Bermuda Bay card stock, and I repeated the theme of three teal circles with enamel dots in the upper left corner.

Supplies (all Stampin' Up! unless otherwise noted):
Stamps: Elementary Elegance
Paper: Thick Whisper White, Whisper White card stock
Ink: Memento Tuxedo Black, Pool Party, Smoky Slate, Stardust Gelly Roll pen (Sakura); light Pool Party and Smoky Slate Blendabilities markers
Accessories: Pool Party Shimmer Ribbon, vinyl border stckers (Krazy Kreations), sequins, Glue Dots, foam tape (3M)

While this card is more feminine than the previous one, it uses the same color palette.

I stamped the frame in black ink and colored bits of it with Pool Party and Smoky Slate markers. After I colored the crown gray, I went over it again with a Stardust Gelly Roll pen, so it had plenty of sparkle (as any good crown should).

Around the frame I stamped a few blue birds (some of them stamped repeatedly without re-applying ink to create different shades) and added three sequins. I created a border along the bottom of the panel with a piece of ribbon and a strip of a border sticker.

Supplies (all Stampin' Up! unless otherwise noted):
Stamps: Make a Wish stamp and die combo (Taylored Expressions)
Paper: Whisper White, Basic Black, textured Bermuda Bay card stock
Ink: Watermelon Wonder, Bermuda Bay, Tangelo Twist, Cucumber Crush, Crushed Curry, Stardust Gelly Roll pen (Sakura), Project Life journaling pen
Accessories: "Wish" die (Taylored Expressions), foam sheets (Taylored Expressions)

Now this card is definitely a birthday card. And it's one that would work for any recipient.

I started by stamping the candles and flames on a piece of Whisper White card stock. I like the single-layer look of this focal panel, but I also could have die cut the candles and attached them to the card to add dimension.

I used a Gelly Roll pen to add sparkly accents to the candles and drew the wicks with a black journaling pen. I die cut the word "wish" out of black card stock, added sparkle to the little star, and adhered it below the candles. I doodled a basic border around the panel and adhered it to a layer of Basic Black card stock. Using foam tape, I attached the entire panel to a card base of textured Bermuda bay card stock.

Thank you for stopping by today, whether it was your first visit or fiftieth. I hope I've given you a little bit of crafty inspiration this year. Have a safe and happy New Year's Eve!


Sunday, December 30, 2018

Bubbling over with happiness

In my last post I shared two versions of a very clean and simple birthday card. Today I have a card that's a little wild and crazy, "bubbling over" with bright colors and pattern.

Supplies (all Stampin' Up! unless otherwise noted):
Stamps: Bubble Over
Paper: Bermuda Bay, Coastal Cabana, Granny Apple Green, Whisper White card stock; Bubbles & Fizz Designer Series Paper (DSP); gold foil sheets; alcohol ink card stock (YUPO)
Ink: Bermuda Bay, Coastal Cabana, Granny Apple Green; alcohol inks: Honeycomb, Botanical, Aqua (Ranger)
Accessories: Bottles & Bubbles Framelits dies, Merry Minis punch pack, clear droplets (Pretty Pink Posh), gold washi tape (unknown), sponge, Dimensionals

That's a lot to look at, right? I may have gone a bit overboard, but I think you need to do that every once in a while.

This card started with the background panel in the middle of the card, which I made with alcohol inks, and snowballed from there. I chose three coordinating colors -- Coastal Cabana, Bermuda Bay, and Granny Apple Green -- and decided to add gold accents.

I knew I wanted to add pop bottles, so I die cut them out of Granny Apple Green card stock and sponged ink around the edges. I added gold straws and labels with gold stars and then set them aside.

For the card base I used Bermuda Bay card stock and stamped bubbles all around the edges. I mounted the alcohol ink panel on Coastal Cabana card stock on adhered it in the middle of the card base. Since the background panel was so bold, I needed to break up the color a bit so the bottles were easier to see. I cut a strip of Bermuda Bay DSP patterned with stars and adhered it horizontally across the card. I added a piece of polka dot washi tape to echo the theme of the bubbles and bring in a little more gold. I used Dimensionals to adhere the bottles on the card, and for one final detail I glued several clear droplets around the tops of the bottle.

Inside the card I added a panel of Whisper White card stock and stamped the sentiment with Bermuda Bay ink. Since the front of the card was so busy, I didn't want to leave the inside too stark. I decided to add one more die-cut bottle, this one with a bottle cap instead of a straw.

Thanks for stopping by, and I hope all your days bubble over with happiness!


Wednesday, December 26, 2018

Simple and (slightly) stepped up

Merry Christmas (a day late)! I made it through the holiday, although I feel completely exhausted. I didn't finish all the cards I wanted to make for my uncle, but I wrapped up what I had and told him I owed him the rest. I'm hoping to get started on those tomorrow. But for today I'm going to check a blog post off my to-do list.

The two cards I'm sharing here are very similar. The first one is a simple birthday card, and the second one is a stepped-up version of that card -- although it's not a very big step up; it's more like a little baby step up.

Supplies (all Stampin' Up! unless otherwise noted):
Stamps:Yippee Critters stamp & die combo (Taylored Expressions)
Paper: Soft Sky, Basic Black card stock; Mirri sparkle paper variety pack (The Paper Cut)
Ink: Memento Tuxedo Black
Accessories: Balloon Bouquet punch, Sentimental dies (Avery Elle), Viola sequin assortment (Craft Medley), Dimensionals, Glue Dots, Corner Chomper (We R Memory Keepers), Art Glitter Glue (Art Institute Glitter)

For this card I started by stamping the three balloon strings on a Soft Sky card base. I punched three balloons out of sparkly paper and added them to the card, using Dimensionals for two of them to add some depth.

Instead of stamping a sentiment, I die-cut the word "celebrate" out of Basic Black card stock and adhered it along the bottom of the card. I added three purple sequins for embellishment, and rounded the corners of the card base to finish it off.

This would be a great layout for a beginning card maker (or an experienced one who is short on time!). It uses just a few supplies, but the touches of sparkle keep it from being boring. And if you don't have a die-cutting machine, just use a stamped sentiment or omit it altogether and let the balloons shine.

Supplies (all Stampin' Up! unless otherwise noted):
Stamps:Yippee Critters stamp & die combo (Taylored Expressions)
Paper: Soft Sky, Basic Black card stock; Mirri sparkle paper variety pack (The Paper Cut)
Ink: Memento Tuxedo Black
Accessories: Balloon Bouquet punch, Sentimental dies (Avery Elle), Skinny Mini Party Borders dies (Taylored Expressions), Mermaid Mix sequins (Pretty Pink Posh), Dimensionals, Glue Dots, Art Glitter Glue (Art Institute Glitter)

For this slightly stepped-up version of the card, I created a little more of a party feel. I die cut a few banners and adhered them to the card base to add a little oomph to the background. I decided to use the same color card stock for the banners as the card base so they didn't complete with the balloons. I also used more sequins in two different sizes and colors (although they were part of the same sequin mix) so they look more like falling confetti.

The only other change with this card is that I didn't round the corners. Since the die-cut banners go right to the corners I wanted to keep the straight edges to look like a wall.

I like both versions of this card, but it's fun to see how even a couple of small changes can give a card a little boost. Thanks for stopping by!
Thursday, December 20, 2018

Trying to catch up

I am so behind on my blog posts that all the cards I've been sharing are ones I made months ago. I've still been making cards and other projects -- I have a slew of pictures on my camera to prove it. But I've been so overwhelmed with holiday tasks and preparations that I can't keep up with sharing them.

My end-of-the-year goal is to finish posting the "old" cards -- the pictures I already have on my flash drive -- by Dec. 31. Then I'll start the new year with the photos that are still on my camera. I'll still be behind, but at least not quite so far behind.

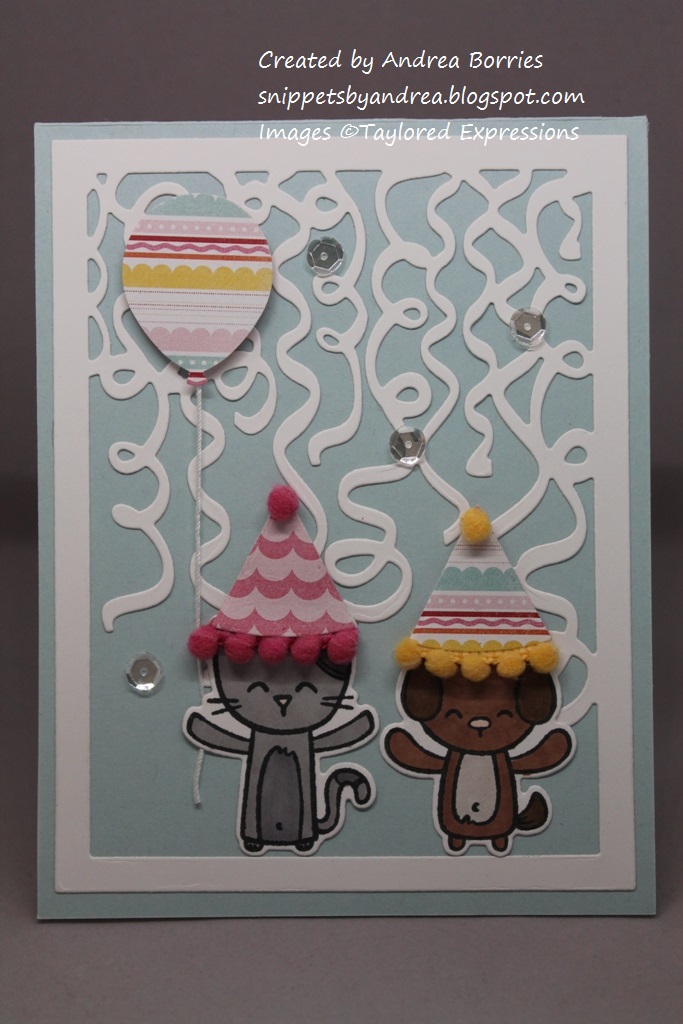
Tonight I'm going to share three kid-friendly birthday cards. For the sake of time I'm just going to include the photos and supply lists, so if you have any how-to questions, please post a comment and I'll respond as soon as I can.

Supplies (all Stampin' Up! unless otherwise noted):
Stamps: Under the Flower stamp and die combo (Taylored Expressions)
Paper: Granny Apple Green, Whisper White, Highland Heather, Flirty Flamingo card stock
Ink: Granny Apple Green, Memento Tuxedo Black; Blends/Blendabilities: Skin Tone Assortment, Pineapple Punch, Granny Apple Green, Highland Heather, Flirty Flamingo
Accessories: Frame in Frame 2 Cutting Plate (Taylored Expressions), sequins (Craft Medley), Lucky Limeade baker's twine, Daffodil Delight 1/8" taffeta ribbon, clear Wink of Stella glitter brush pen, Dimensionals

Supplies (all Stampin' Up! unless otherwise noted):
Stamps: Yippee Critters stamp and die combo (Taylored Expressions)
Paper: Soft Sky, Whisper White card stock; Happy Day paper pad (My Mind's Eye)
Ink: Memento Tuxedo Black; alcohol markers: Bronze, Mocha, Smoky Slate, Nude (Blendabilites); Warm Gray No. 3 (Copic)
Accessories: Curly Q Cutting Plate (Taylored Expressions), Party Hat die (Taylored Expressions), Balloon Bouquet punch, crochet thread (DMC), Melon Mambo and Daffodil Delight pompom trims, sparkling clear sequins (Pretty Pink Posh), Dimensionals, Glue Dots

Supplies (all Stampin' Up! unless otherwise noted):
Stamps: Yippee Critters stamp and die combo (Taylored Expressions)
Paper: Soft Sky, Whisper White, Real Red, Pacific Point, Crushed Curry, Garden Green card stock
Ink: Memento Tuxedo Black; alcohol markers: Bronze, Mocha, Daffodil Delight, Nude (Blendabillities); Warm Gray No. 3, Cool Gray No. 1 (Copic)
Accessories: Build-A-Scene Rolling Clouds dies (Taylored Expressions), Grassy Border Lawn Cuts (Lawn Fawn), Dimensionals


 Thanks for stopping by!