Saturday, September 3, 2011

Farmer's market cure?

I woke up this morning with a nasty head cold. It figures. A long holiday weekend. A trip to the State Fair planned for tomorrow. I should have expected to get sick, right? Yes, I am often surrounded by drippy noses at work, and I can't count the times I've had a baby or toddler cough or sneeze in my face. But I've built up an immunity, so I don't actually get sick much. Until, of course, it's inconvenient.

So I forced myself out of bed and took an allergy pill to help with the runny nose and sneezing and a couple Excedrin for the sinus headache and a jolt of energy. I laid around a bit, did some reading, played on the computer. After a while I felt a little better and decided I would head to the farmer's market, which had been my plan before I woke up feeling like my head was stuffed with cotton balls. I even made myself walk there and back. Figured maybe I could sweat out the cold.

I'm glad I went, because even though neither of the two places I really wanted to visit (A Toast to Bread and Deena's Gourmet Hummus) was there, look what I did find:


Yep, I bought myself a bouquet of flowers (along with some tomatoes, yellow zucchini and raspberries). And they make you smile, right? Just walking around with flowers in my bag made me feel happy. Bright yellows and pinks. How can they not make you feel at least a little more cheerful?

Now I'm not saying flowers are a magic cure-all, but for the rest of the day (at least so far), I've felt great. Who knows, maybe I did actually sweat it out. But regardless, it's a good thing I'm feeling better. Because I am going to the Fair tomorrow, and I am going to eat something deep fried and on a stick (okay, probably more than one thing). But I will be much happier doing it if I'm not sniffling and sneezing.

Thanks for stopping by!


Friday, September 2, 2011

Halloween window card

I found a little time to stamp this afternoon, and I decided to make a Halloween card. I had an idea to stamp a haunted house inside a card and then create a window in the card front so you could see the house inside. Here is what I came up with:

Supplies (all Stampin' Up!®)
Stamps: Home Is Where the Haunt Is, Spooky Bingo Bits
Ink: Chocolate Chip, Jet Black StazOn®, Whisper White craft
Card stock: Chocolate Chip, Bordering Blue
Accessories: Window sheets, 2-1/2" circle punch, Basic Black 1/8" taffeta ribbon, Iridescent Ice embossing powder, Dimensionals

I added a window sheet behind the punched circle and stamped a few bats on the window sheet so they look like they're flying around the house. The trees on either side of the window and the witch flying past the moon complete this little spooky scene. The witch and "eek!" are both stamped on Bordering Blue and cut out. The moon is just a little sparkly, compliments of the Iridescent Ice embossing powder.

On the inside of the card I added a greeting and a fence around the house. (I stamped the fence crookedly on purpose to fit with the style of the house.)

This was a fun and pretty easy card to make. I do really like the idea of having a window and a little scene on the card, but there's something about the composition I'm not crazy about. It might need a punch of a brighter color somewhere. Or maybe some tweaking to the layout. I guess I'll have to see what other ideas I can come up with!


Thanks for stopping by!

Wednesday, August 31, 2011

It's been a month!

I haven't had time to do any stamping yet this week, but I wanted to share something to mark the end of my first month blogging (can't believe it's already been that long). So here is a thank-you card I made a few weeks ago:

Supplies (all Stampin' Up!®):
Stamps: Raining Flowers, Medallion, Tiny Tags
Ink and card stock: Pool Party, Real Red, Old Olive
Accessories: Old Olive 1/8" taffeta ribbon, Victoria crochet trim, Basic Pearls, linen thread, Dotted Scallop Ribbon Border punch, Jewelry Tag punch, Itty Bitty Shapes punch pack, Ticket Corner punch, Mini Glue Dots®, Dimensionals

I was really pleased with how this card turned out, and I even mailed it in a small padded envelope so it didn't get wrecked. (This picture doesn't do it justice, but since I don't have the card anymore, I can't take a better photo. Bummer.) For the focal image, I stamped the flower three times and cut out the different "rows" of petals, so I had a small flower, medium flower and large flower. Then I layered them on each other with Glue Dots, creating a little bit of dimension. With the stem, I also stamped and cut out an extra pair of leaves to place behind the flower. I wrapped the whole focal piece with a bit of ribbon, added a lace tab to the right side and adhered it to the card with Dimensionals. The tag, which is stamped "thanks {so much}," is tied onto the lace with linen thread.

I think the Medallion stamp works great in the background here; it's a strong image and balances the layout, but since it's stamped in the same color as the card stock, it doesn't overpower the focal point. I added three small punched flowers with pearl centers in the upper left corner, as well as a pearl on the main flower. Finally, the Dotted Scallop Ribbon Border punch gives a soft edge at the bottom of the card.

I hope you liked this card and the other projects I've posted during the last month. Thanks for stopping by!

Monday, August 29, 2011

Telescoping card

This weekend I decided to play along with the Virtual Stamp Night (VSN) challenges on SCS. Unfortunately, it was kind of a busy weekend, so I only had a chance to complete one of the challenges. There were several challenges that sounded interesting to me, though, so I might go back when I have more time and try them just for fun. Anyway, the challenge I participated in was to make a telescoping circle card. With this type of card, you have three circles that are stamped/decorated individually and then assembled (with largest on the bottom, smallest on top) in such a way that it looks complete when it's closed but when you pull a tab, it swings open so you can see all the circles. I think it's easier to understand when you see a picture, so here's the card I created:

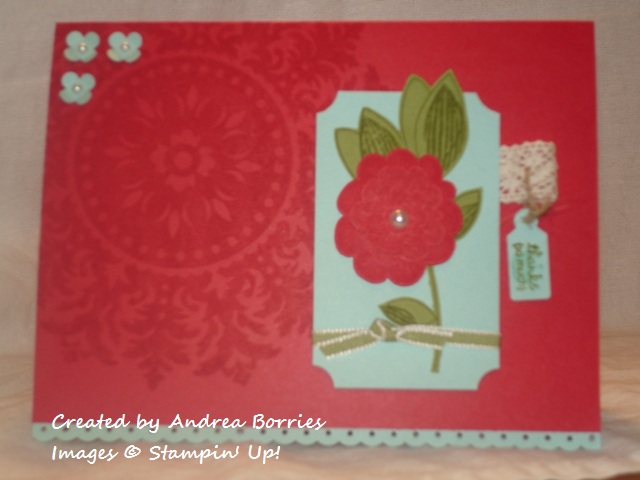
This is a view of the card when it is closed.
Supplies (all Stampin' Up!® unless otherwise noted):
Stamps: Best Friends Forever, Curly Cute, Birthday Greetings
Paper: Carousel Notes II Cards & Envelopes (for the Kiwi Kiss scallop), Pink Lemonade large scallop circle and Espresso scallop circle (The Paper Cut), Very Vanilla, Pink Pirouette
Ink: Kiwi Kiss, Pink Pirouette, Early Espresso
Accessories: 5/16" neutrals brads, Victoria crochet trim, Basic Pearls, Itty Bitty Shapes punch pack, sponge, Glue Dots


Now, the easiest way to get three circles of graduating size is to use some type of die that cuts the shapes for layering. I do not yet have any such dies (well, I have oval ones, but no circles). And I wasn't sure that I had time to run around the apartment trying to find the right size circles to trace (plates, bowls, glasses, etc.) because most VSN challenges have a 45-minute time limit for making your card. But then I happened to remember these scallop circle die cuts I have, and lo and behold, they worked! The scallops don't line up perfectly because they are from different companies (the bottom is from Stampin' Up!, and the other two are from The Paper Cut), but they were close enough. I did end up having to trace circles for the three layers inside the scallop circles -- I think I used a spool of ribbon for the two smallest ones and a plastic storage container for the larger circle -- but that wasn't too bad.

This is a view with the top layer swung open so you
can also see the middle layer.

As you can see from these first two layers, I chose to keep the same "theme" going on all the layers of my card. Kind of a shabby chic/collage feel. Not my usual style, but I think it works here. (This stamp set is one of the ones I received at Convention, and this is the first time I've used it since completing my make-and-take projects from Convention.)

I looked at quite a few of the telescoping cards that other stampers made for the challenge, and some people made each layer completely different but still coordinating. I honestly didn't even consider that idea; I think with the time limit I was worried I wouldn't finish in time, so I just did what seemed like it would be the fastest. But I think next time I'll try something different for each of the layers. (I saw the absolutely cutest telescoping card made to look like a snowman; I think I'll be using that idea for some Christmas cards this year.)

This is a view of the card when it is completely open.
I left the bottom layer of my card pretty plain so there was room to write a message for the card recipient. But you could also do more stamping on the bottom layer and then use the back for a message.

To assemble the card, use brads to attach the bottom layer to the middle and then the middle layer to the top. the trick is to remember to attach the top edge of the bottom layer to the bottom edge of the middle layer and then the top edge of the middle layer to the bottom edge of the top layer. (Clear as mud?) So when the card is completely closed, the middle layer is actually upside down. And take your time when punching holes for the brads to be sure that they are opposite each other, or the card won't be straight when it is open. (My card is straight, I just don't have it sitting quite right in this picture.)

The last step is to add a tab at the top edge of the top layer to use for opening the card. This was the first time I've made a telescoping card, and it was much easier than I thought it would be. Give it a try!

I'm not sure how much time I'll have for writing blog posts in the next couple of weeks since I'm trying to get everything ready for my stamp-a-stack event in early September. I'll do my best to post every couple of days, but if you don't see anything for a bit, that's why. Thanks for stopping by!

Saturday, August 27, 2011

One more card set

After finishing my last card set yesterday, I decided I wanted to stamp another set today, but a set that was much easier to produce. I used pre-cut and -scored 3" x 3" cards and patterned paper -- two things that make it really simple to create a set of cards.

Supplies (all Stampin' Up!®, except crochet thread):
Stamps: Very Punny
Card stock: Whisper White, Daffodil Delight, Regal Rose, Old Olive, Pumpkin Pie, Pacific Point, Real Red, Rich Razzleberry, Melon Mambo, Brights Collection Patterns DSP Stack
Ink: Jet Black StazOn®, Daffodil Delight, Regal Rose, Old Olive, Pumpkin Pie, Pacific Point, Real Red, Rich Razzleberry, Melon Mambo, Blush Blossom, Early Espresso
Accessories: Aqua Painter®, crochet thread, Basic Rhinestomes,1-3/8" circle punch, Scallop Circle punch, Small Heart punch, Dimensionals

I really love this set of cards. They're simple, and there really isn't any "wow" factor to them, but they're cute and sweet, and sometimes that's all you need. I think the layout, bold colors, polka dot patterned paper and stamp set all work well together.

To color the images, I used an Aqua Painter and the individual ink pads. (Push down on the ink pad lid while it's closed, then open it and dip the Aqua Painter in the ink that is in the lid.) And they did need just a little embellishment, so I added a bit of crochet thread and a rhinestone in the corner of each card (a little bling is always good).

Since the cards turned out so cute, I didn't want the envelopes to be a plain, boring disappointment. So I used the Small Heart punch to punch two hearts out of the polka dot DSP for each color. Then I glued the hearts onto the front of the envelopes, so each card has a coordinating envelope (see photo below).

To package the cards, I made a simple gift box and glued one heart punch of each color on the box lid. I didn't take pictures of the box, but it's pretty basic. Maybe I'll show how to make the box in a future tutorial -- it's nice to be able to make an easy box in just about whatever size you need.

This type of card set is probably one of my favorite stamping projects. Once I decide on a layout, they are quick to create (not much thinking needed), but because each card is just a bit different, I don't get completely bored making them. And they're fun little gifts to have on hand. I think I now have four card sets ready to go, so I should be set for a while. Better start working on some other projects!

Thanks for stopping by!