Tuesday, May 23, 2023

A dozen cards

I have three groups of cards left to share from the craft retreat I attended at the beginning of the month. Originally I was going to share each group in a separate post. But then I decided I was ready to move on to other things, so instead I'm going to share them all in one post. There are twelve cards altogether, so I'll just add a sentence or two about each card.


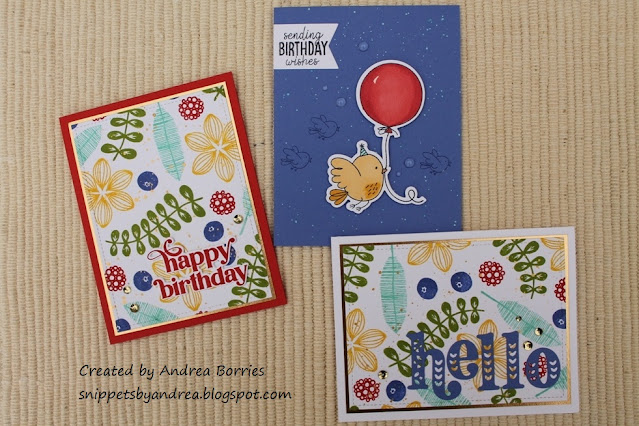
I love the color palette of these cards! The blue card was made for one of the challenges on my retreat BINGO board (to use Tri-Blend alcohol markers). I didn't want to do a lot of coloring, so I chose images that weren't too small or detailed. I colored and die cut the images and added a few small birds and some paint splatter to the background. For the other two cards, I stamped all the images on a half sheet of white card stock then trimmed it down for two card backgrounds. Each panel is matted with gold foil card stock. I added a stamped greeting to one card and die-cut letters to the other.

Most of these cards were designed for challenges. For the upper left card, the challenge was to make a card where 90% of the embellishments were made with stamping. I stamped and die cut a bunch of flowers and leaves for my embellishments. For the top middle card, the challenge was to make a card primarily with the products we received in our goody bags. The products I used were the patterned papers, the blue "happy" strip, and the arrow embellishments. The top right card wasn't a challenge; just a simple stamping card to try out a color combo. For the bottom left card, the challenge was to use three different die sets; I chose the flowers, the label shape, and the scalloped border. The last card was a color challenge. I stamped the colored blocks using the colors I chose for the challenge and then I added a small punched flower of each color for a simple embellishment.

And we're down to the last three cards! The purple card on the left was not a BINGO challenge, but it was a personal challenge. By the time we were starting to wrap up on Sunday morning I realized I had used every stamp set I brought with me except one. So I had to squeeze out one more card so I could say I'd used every stamp set. Yahoo! The other two cards were two more color challenges. For the card in the middle I used ink as the way to work in all my colors. I tried that method for the card on the right, too, but I wasn't crazy about how those three ink colors looked together. So instead I focused on card stock with a couple of die-cut sprigs and little punched flowers.

That's it! I've shared all 53 cards I made during the retreat. If you have any questions, just leave me a comment, and I'll do my best to respond as soon as I can. I'm not sure if I'll be back with another post this week. I have an idea brewing for a project, and if I decide to do it, I'll be busy making a bunch of cards in a short amount of time. :)

Thanks for stopping by!

Thursday, May 18, 2023

Challenges with patterned paper

Once I finished my Christmas cards and card sets at the craft retreat, I focused on making individual cards (mostly birthday ones) and completing challenges so I could mark off squares on my BINGO board. Today I'm sharing three of those challenge cards that I made with patterned paper. 


I really like this patterned paper with the different colored dots; it has a very summery, celebratory feel to me. And I think it works perfectly for these cards -- both as a background and as an accent. 

The top and left cards were both part of a sketch challenge. We had to make two cards using the same sketch, and if you rotate my left-hand card ninety degrees counterclockwise, you can see that both cards have the same basic layout: a narrow banner, a wider banner, and a rectangular element that goes across both banners. I added an additional small sentiment to each card and finished them with either clear droplets or gold sequins.

For the card on the bottom right, the challenge was to "scrap-lift" a layout from another retreat attendee. My aunt had made a 6" x 8" scrapbook page with a background made of different paper and card stock circles. I really liked that idea, so I adapted it for a card. I figured out I could fit six circles on an A2 card, so I started by die cutting two from the patterned paper. I chose three coordinating card stock colors, die cut the circles, and stamped a different tone-on-tone pattern on each circle. For the last circle I used gold foil. I glued the circles to a white card base, added two sentiment strips, and finished the card with gold sequins.

Thanks for stopping by!


Wednesday, May 17, 2023

Card sets with Everyday Doodles

When I shared the first cards I made with the Everyday Doodles and Everyday Punnies stamp sets, I mentioned that I wanted to use those stamps to make a couple of card sets. That was my second goal (and second accomplishment) at my craft retreat a couple of weeks ago.

For my card sets I chose eight images and sentiments and then paired each with a different main color. And since the images are relatively small, I decided to use note card bases, which are 3-1/2" x 5" (4 bar size). 

For the first card set, I cut a piece of each colored card stock to layer on the card bases and splattered the pieces with metallic white paint. I adhered them to the card bases (portrait orientation) and added a strip of black card stock across each card front. For the images, I stamped each outline in black two times and then stamped the fill-in image in the appropriate color. (I only stamped the bird once since I used the balloon for the second image.) After I die cut the images I glued them to small rectangles of white card stock. I matted the focal panels with black card stock and used foam tape to adhere them over the black card stock strips. I stamped the sentiments on strips of white card stock (I used the strips leftover from cutting white card stock into card panels) and then adhered them just below the focal panels.

For the second card set, I kept the same images, sentiments, and colors. This time I cut a narrow strip of each colored card stock and adhered them to the card bases (landscape orientation) about one-third of the way from the left edge. Then I stamped a sentiment in the lower right corner of each card base. I used a splatter stamp to add color to the right side of each card, making sure to leave space around the sentiments so they weren't hard to read. I stamped and die cut the images, adhered them to black stitched circle die cuts, and then attached each circle to the corresponding card base over the colored strip. I wanted a little sparkle on the cards, so I finished them with a few clear sequins.

I'll be back later this week to share a few more of the cards I made at the retreat. Thanks for stopping by!


Saturday, May 13, 2023

May Christmas cards: Mittens & Mistletoe

When I was on the craft retreat last weekend, I had two main goals: to finish my May Christmas cards and to make two card sets. And I accomplished both of them -- plus some. Today I'm going to share the Christmas cards I made using the Mittens & Mistletoe paper and coordinating ephemera from American Crafts.


I used less than half the paper pack and most of the ephemera to make twenty-three Christmas cards, which puts me at fifty-two for the year so far. (I don't think I'll need to make too many more.) I also have the Mitten & Mistletoe washi tape, but I didn't end up using it on the card fronts. I think I'll add it to the envelopes when I mail the cards. In addition to the patterned paper and ephemera, I used colored card stock for card bases and layers, gold card stock for accents, sentiment and shape dies, sequins, twine, and metallic watercolor paint for splatter.


The top middle card in this photo and the one below are Cherry Cobbler card stock, although it looks brownish. (I was taking pictures outside and trying to hurry because it started to rain.) I really like the colors in this patterned paper. Pink is a little challenging for me with Christmas cards, but I do think it works really well with the other colors.


I think the snowy camper and tree on the second card in the bottom row is one of my favorite pieces from the ephemera pack. I also love the little woodland animals and mushrooms in the first photo. There were so many cute pieces!


For these four cards I used the same layout because they were part of a sketch challenge. The woman who organized the retreat created a BINGO board filled with a variety of scrapbooking and cardmaking challenges. When you completed challenges and got a BINGO you earned tickets for a prize drawing. Anyway, for this challenge, I had to make four cards in one hour using a sketch from an idea book. I don't usually use angled paper layers, but I really like how these turned out. And it even inspired me for another card I made later during the retreat. :)

I'll be sharing more of my retreat cards next week. Thanks for stopping by!


Sunday, May 7, 2023

Be Free in two styles

I'm a little late with this post. It was supposed to be my second blog post last week (I've been doing a pretty good job sticking to two posts a week!), but I actually went on a craft retreat over the weekend. It was my first retreat in four years (the first time I've gone anywhere since 2019), and I was busy getting ready and then having a great time, so I didn't get to blogging. But I made 53 cards over the weekend, so I'll have plenty to share for the next few weeks. :) 

Tonight I have a quick post featuring two cards made with the Be Free stamp set from Colorado Craft Company. 


For the first card I colored the image softly with colored pencils. I wanted it to have some dimension, so I cut out the die a few extra times and glued them together. (I love that the die even cuts out the spaces between the bars of the bird cage.) For the background, I stamped the lock and key images from the set on a Crumb Cake card base and added gold splatter. I added a few punched flowers and a twine bow for the final touches.


For the second card, I wanted a look that was a little more bold. I colored the focal image on this card with alcohol markers. I stamped a polka dot background on a red card base and added some gold splatter. (I've been loving splatter lately!) A small gold doily, a twine bow, and a few gold glitter enamel dots finish off this card.

Thanks for stopping by!


Wednesday, May 3, 2023

Bits and pieces

When I am crafting I often end up with bits and pieces -- a die-cut word, punched shapes, background panel, etc. -- that don't quite work for the card I'm making. If they're something I think I can use later, I save them, either in a little dish on my desk or in a plastic container. Recently I decided to put some of these pieces to use in a few birthday cards.

For these two bright birthday cards, the only "new" items I used were the card bases, the black sentiment strip on the yellow card, and the enamel dots. The "oval" shapes on the blue card were the leftover pieces from Christmas cards I made last year. I think they make a fun background!

For the butterfly card, I used a lot of bits and pieces, and I only added the gray card base. It's hard to see in the photo, but that card base (as well as the blue card base above) is splattered with some Sparkle Silk. For the owl card, I used a layer of woodgrain card stock on the card base. I had all the owls stamped from a long time ago; I just punched them out with a circle punch. I did have to stamp and punch out the sentiment because I wanted something punny. I also added the little party hats to make the card a little more festive. 

It always feels good to use some of the bits and pieces hanging around my desk -- because I know I'll probably have more to add to the pile soon. :) Thanks for stopping by!