Wednesday, June 28, 2023

Gel printing session

Quick post today! I haven't made any gel prints in awhile, so on Monday afternoon I set aside a few hours and had fun getting all painty. Here are the results:

Here is a close-up of a couple of the prints so you can see the little variations in pattern and flecks of color that are never the same twice.

I don’t get too elaborate with my prints because I like to use them as card backgrounds. I hope I’ll be using some of these prints soon so you can see them “in action.”

Thanks for stopping by!


Tuesday, June 27, 2023

Contest entries

In a couple of weeks I'll be headed to a stamp show -- yippee! Every year they have a card contest with two themes (one for Saturday and one for Sunday), and you can submit two cards for each theme. The deadline for submitting cards has passed, so I wanted to share the four cards I made. Here they are:

The theme for Saturday is "Abracadabra." I thought about making something with rabbits coming out of a top hat, like the classic magician's trick, but instead I decided to go with the theme of magic in general.

Fairies are definitely magical! This stamp set from Taylored Expressions was fun to color, and I love that with whimsical images the colors don't have to be realistic. I chose four colors -- pink, orange, green, and blue -- and used those for almost all of the coloring, with a dark and light pencil of each color for shading. I used Prismacolor pencils and a blender pencils. I like coloring with pencils more than markers, because I feel like I have better control.

For the card base, I ink blended clouds with white ink on a light blue card base and splattered on some Sparkle Silk. I die cut two strips of grass from green card stock and adhered one layer directly to the card base and the other one using foam tape. Then I added all the pieces, stamped the sentiment and added a few sequins.


I think this is my favorite card of the four. The mediaeval images in an old My Monthly Hero kit from Hero Arts were perfect, so I stamped the wizard and unicorn on white card stock, colored them with colored pencils, and die cut them. I used a white card base and lightly ink blended a line near the middle to give the images a grounding point. I used foam tape to attach the images and stamped the sentiment and a few little star clusters. (The stars were from a different stamp set, but they worked perfectly here.) I finished off with a few silver star sequins.

The theme for the Sunday card contest is "Lullaby." I don't have many baby-themed stamps, so I decided to focus on two songs: "Twinkle, Twinkle, Little Star" and "You Are My Sunshine."

I actually used a twist on the "Twinkle, Twinkle" lyrics for this card. And I know it doesn't look terribly impressive, but I stamped each of those letters individually. Whew. The spacing between the lines could have been a little smaller, but all in all, I'm pretty pleased with how it turned out -- and I was really glad I only had to stamp out the sentiment one time.

For the rest of the card, I used a navy card base stamped with a starry background using gold shimmer paint. I also used the shimmer paint to sponge the edges of the sentiment layer and to add sparkle to the three wooden stars.

This is a fairly simple card, but I think it's my second favorite. (I'm a sucker for a good clean and simple card.) The colors in the rainbow were created with a stencil -- and the last arch is a dark bluish purple. (Sorry for the poor lighting; I was trying to hurry with the pictures so I could get the cards in the mail on time.) I stamped the sentiment, the heart, and the loopy line in black and then a few star clusters in light blue. I added two die-cut clouds, one stamped with a face, of course, and finished the card with a few clear droplets.

I don't know if I'll win anything (the prizes are money to spend at the stamp show), but it's fun to try! I'll report back after the show. Thanks for stopping by!


Saturday, June 24, 2023

Framed birthday greetings

As I mentioned in my last post, after I cut out and painted all the Funky Nordic shapes for Christmas cards, I had a few that didn't seem to fit o holiday cards. I set those aside and used them on a birthday card instead.

At first I wasn't sure what kind of layout to use, and then I had the idea to add the die cuts to the corners of a frame. I found a crimped piece of Crumb Cake card stock that had been in my envelope of scraps forever and decided to try using it to die cut the frame. And I think it looks great! I love the added texture, especially with the flowers and leaves.

The rest of the card is pretty simple: I stamped "happy birthday" in the middle of the card front and added a few gold sequins. At the very end I decided to add some gold splatter, so I carefully and gently tapped my paintbrush to add the flecks of gold. (It worked okay, but next time I'll try to think of that before the rest of the card is done!)

Thanks for stopping by!


Friday, June 23, 2023

June Christmas cards: Nordic notecards

In looking back over the Christmas cards I've made so far this year, I haven't done a lot of stamping. There's been patterned paper, die cuts, ephemera, and even some watercolor. Well, for my June Christmas cards I decided to combine a couple of those techniques -- die cuts and watercolor -- to create some clean and simple Nordic-themed notecards.

I used the Funky Nordic dies by Tim Holtz (Sizzix) to create these cards. I started by die-cutting all the pieces a few times from watercolor paper. Tip 1: Since most of the images include multiple pieces, and some are very small, I used lids from old yogurt tubs to keep the pieces separated by image. Once I had everything cut out, I started painting them. I wanted the pieces to be bold, so I applied the paint pretty heavily. (I think that tactic came back to bite me because I kept finding red smears on my card bases, as if the color was rubbing off the die cuts. That was frustrating, but I managed to work around or cover up most of them.) Tip 2: For the tiniest pieces, like the little circles on the red flowers, I attached the pieces to a piece of low-tack tape before painting them to hold them in place.

Once all the pieces were painted and glued together, I began grouping them together for different layouts. (I did do an online search for inspiration with the layouts. I often find that helpful the first time I use a new product.) I used Very Vanilla notecards and envelopes from Stampin' Up! for the card bases, and I added a little gold splatter to the upper part of each card front.

I chose a sentiment for each layout from the Tiny Words Christmas stamp set (Simon Says Stamp) and stamped the greeting before gluing on any pieces. Then I added on the die cuts, either using liquid glue or Dimensionals. I added a hemp twine bow to a couple of the designs, but I didn't use any other embellishments because I thought the cards looked good as is.

After making these cards I ended up with a handful of die cuts that I didn't use because they didn't seem very Christmas-y the way I painted them. So I used those on a birthday card, which I'll share tomorrow. Thanks for stopping by!


Saturday, June 17, 2023

Fruit and fish

I hope you're not tired of seeing card sets, yet! These should be the last sets I have to share for at least a little while. Today's sets have two different themes, which you may have guessed from the title of this post: fruit and sea life. That's a strange combo, I know, but the thing they have in common is punny sentiments.


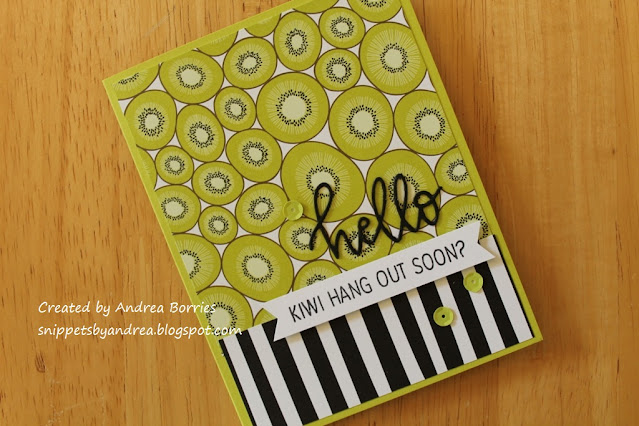
Here are the two sets of fruit cards; the top row is one set, and the bottom row is the second. (Click on the photo to enlarge it and read the sentiments.) I used a variety of "fruity" products from several different companies. Once I had the patterned papers chosen and adhered to each card base, I couldn't decide how I wanted to add the sentiments. So I used two layouts for each set: two cards in each set have fruit shapes, and the other two have either a twine accent or die-cut words.

I think this is my favorite card from the fruit sets. I love the kiwi fruit paper, and the sentiment just makes me smile. I finished off the cards with coordinating sequins.


Here are the final two card sets I have to share. (Again, the top row is one set, and the bottom row is the second.) I've used the same "base" as the other card sets: a 4" x 4" piece of patterned paper at the top of the card base and a 1-1/2" x 4" piece at the bottom. With these cards, though, the patterned paper is almost little scenes. So I added die-cut seaweed, fish, and seahorses on two cards from each set. (Click on the photo to enlarge it.) On the other two cards in each set I added twine above the sentiment and a piece of burlap trim in the upper right corner.


Here is a closer look at one card of each style. Of course I had to finish them off with coordinating sequins.

I was initially a little nervous about handing out these card sets at work because they seem a little more simple than something I might normally make. But everyone seemed to like and appreciate them. Maybe next year I'll start earlier so I can make more.

Thanks for stopping by!


Friday, June 16, 2023

Floral DSP card sets

School's out! The last few days were a little crazy, but we made it. I managed to get a total of eleven card sets made for my coworkers. I was hoping for more, but I ran out of time. I shared the first two sets in my last post, I'll share three more sets tonight, and then four sets in my next post. (I didn't get good pictures of the last two sets because I finished them at the last minute.)

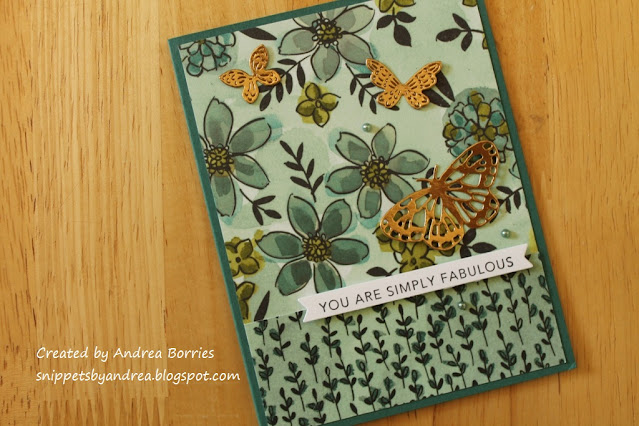
All of the card sets I made had a summery theme; today's cards feature flowers and butterflies and the retired Share What You Love Specialty Designer Series Paper (DSP) from Stampin' Up!.


The top row of cards in this photo is one set, and the bottom row is the second set. I used a multicolored piece of DSP (4" x 4") for the top of each card and a monochromatic piece (1-1/2" x 4") for the bottom portion. (And as usual, it took me way too long to decide how to combine the pieces of DSP and then which color card bases to use with them.)

Originally I wanted to add die-cut flower silhouettes to the cards, but they didn't stand out enough against the bold flowers on the DSP. So I used a variety of butterflies cut from gold card stock instead. For the sentiments on these two sets I used a variety of sentiment strips. I finished each card with a few white or colored pearls.

For the third set of cards I used the same layout as the first two sets, but I switched up the sentiments for something a little different.

Thanks for stopping by!

Friday, June 9, 2023

Bubble Over card sets

We have three days of school left (yippee!), and a few weeks ago I had the idea that I wanted to make cards for some of my coworkers. I waffled between making card sets for a few coworkers and making a whole bunch (like 100) and letting whoever wanted a few cards to pick out what they wanted. I figured out last weekend that I didn't have enough time to make 100 cards, so I decided to make as many four-card sets as I can, and I'll give them away as little "happy summer" gifts.


For the first couple of card sets I used the Bubble Over stamp set from Stampin' Up! (retired) and the coordinating dies and Designer Series Paper (DSP). I die cut soda bottles and round bottle caps from some of the DSP for focal points and embellishments. The caps on the bottles are die cut from silver card stock, and I added small clear droplets on each card to look like bubbles.


I stuck with pretty simple layouts, so the cards are all similar (though no two are exactly the same). I made sure that each card set had four different colored card bases, four different sentiments, and a mix of patterned papers. The bottles on two of the cards in this set were die cut from card stock instead of DSP. I sponged the edges of those bottles with the coordinating ink and die cut labels for the bottles.


While I had all the supplies out, I made a few birthday cards to add to my stash because I think they make good teen cards. For the Crumb Cake card, I used a paper coaster as a layer and I stamped some bubbles and the words "pop" and "fizz" on the top portion of the card.

I'm working on the next few sets of cards, so stay tuned! Thanks for stopping by!


Saturday, June 3, 2023

Rainbow notecards

When I die cut the pieces to make a rainbow for one of my fun with foil cards, I ended up with enough pieces to make four more rainbows. So I combined them with some sentiment strips to make a set of rainbow notecards.


I kept these cards really simple with just the rainbow, sentiment, and a few sparkly sequins. I'm not sure yet what I will do with this set. My first thought was to leave each card in a public place (e.g., the library, on a bus seat, etc.) with a note inside to pass the card on and spread the sunshine. Realistically, I know they could just be thrown away, but I also think the possibility of having my cards shared by random people is pretty cool. (But maybe someone seeing a card in an un-addressed envelope somewhere would just be suspicious? I don't know. Oh, maybe I could put them inside library books. ) On the other hand, I have a friend whose daughter's birthday is coming up, and I think this would be a cute card set for a teenager, too. Decisions, decisions.

That's it for this week. I think the craft retreat -- and the summery weather lately -- sapped all my creative energy. I've wanted to sit down and make cards, but I just haven't had the motivation. I hope I'll have something to share with you next week! Thanks for stopping by!


Thursday, June 1, 2023

Check you out, graduate

I don't have much need for graduation cards, so I don't make them very often. Consequently, I don't really have any graduation-specific stamps or dies. So when I needed to make a graduation card for a friend's daughter recently, I started thinking about the products I do have that could be adapted for the occasion. The Check You Out stamp set from Stampin' Up! (retired) ended up being perfect for the occasion.


I used this layout the first time I made cards with this stamp set. I thought the stack of books would be fitting for a graduate. And I was pleasantly surprised to find that there was also a little grad cap image to put with the owl. I had forgotten about that, but it's perfect! I also remembered the "Congrats, graduate" sentiment on the Simple Strips Background stamp from Taylored Expressions, so I used a sentiment strip to give the owl something to perch on. Three glitter dots finish off the card.

Thanks for stopping by!