Next weekend I'm spending several days with a friend for our annual craft weekend. I've been looking forward to it for months, and in honor of the occasion I have a sewing-related card to share today.
Supplies (all Stampin' Up! unless otherwise noted):
Paper: Thick Whisper White, Whisper White, Basic Black card stock; Let's Polka in the Meadow petite paper pack (Lawn Fawn); silver foil paper
Accessories: Triple Circle Card-Making die (The Paper Cut), Dress Up Framelits dies, Handmade Charms die (Taylored Expressions), Lacy Brocade embossing folder, rhinestones, mini silver brad, silver metallic thread, 1-1/4" circle punch, Glue Dots, Dimensionals, Fine-Tip Glue Pen
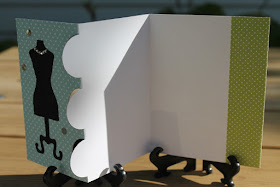
I used the Triple Circle Card-Making die from The Paper Cut to make the card base and to cut the blue patterned paper to exactly the right shape to layer on the card front.
To contrast with the light-colored paper, I used Basic Black card stock to cut out the dress form and three 1-1/4" circles to layer on the circles in the card base.
I embossed the dress form with a feminine, lacy-looking embossing folder and adhered it to the middle of the card front. To embellish it I added a "necklace" of tiny rhinestones and three silver sequins.
For the inset circles, I decided to add three small sewing-related die-cut shapes. I wanted to give the die-cuts a little "oomph," so I used silver accents. The simplest shape was the sewing machine; that one I just cut from silver foil paper. For the spool, I die cut the shape out of white card stock and wrapped it with metallic silver thread.
The scissors was the trickiest, but the most fun. I cut the shape out of white card stock and silver foil. I trimmed just the handles off the white scissors and adhered them over the handles on the silver scissors. Then I placed a mini silver brad at the top of the scissor blades to look like the screw that holds together a real scissors. (Looking at the card now, I think I should have also added a couple of mini brads to the sewing machine die-cut to look like buttons.)
I attached the spool shape to the middle black circle using Dimensionals. The other two are glued down flat.
Inside the card I added a strip of light green polka dot paper to the right edge. I cut the strip wide enough to fill the space behind the circles plus a little extra. That leaves plenty of room to write a note or stamp a sentiment inside the card -- and it also provides a "boundary" for your message if you don't want to see the writing when the card is closed.
Thanks for stopping by!


Oh wow! That's so awesome! I love it "sew" much:-)
ReplyDeleteSunshine, New Zealand
www.ihearttostamp.blogspot.com