Are you ready for more birthday cards? Here are three fun and festive designs that will help make the recipient's special day even better. And while all three cards are already pretty clean and simple, I've also included tips for modifying the designs so you can create each one in just a few minutes. Perfect for those times when you need a last-minute birthday card.
Supplies (all Stampin' Up!):
Stamps: Perfect Party, Banner Blast
Paper: Lucky Limeade, Whisper White card stock
Ink: Lucky Limeade, Island Indigo, Pool Party, Hello Honey
Accessories: Banner punch, wooden stars (from Hooray It's Your Day card kit), Mono Multi liquid glue, Glue Dots
My first step for this card was to stamp several little banners on Whisper White card stock and then punch them out. I played around with the arrangement on the front of the card and then adhered them when I was happy with the design. (I had enough punched pieces left over to also include a banner on the inside of the card.) Then I simply stamped the sentiment and glued on a few wooden stars.
Short on time? Skip stamping the banners and just punch the pieces from coordinating patterns of Designer Series Paper (DSP). Use self-stick embellishments (e.g., rhinestones or candy dots) instead of the stars so there's no drying time for glue.
Supplies (all Stampin' Up! unless otherwise noted):
Stamps: Woo Hoo!
Paper: Real Red, Basic Black, Whisper White card stock; silver glimmer paper
Ink: Memento Tuxedo Black; Blenabilities: Soft Sky, Daffodil Delight, Cherry Cobbler, Old Olive, Skin Tones assortments
Accessories: Decorative Dots embossing folder, foam dots (unknown)
I love this stamp with all the different birthday greetings and fonts. And it's easy to use -- just stamp and color. I hand cut around the scalloped edge and mounted it on a piece of Basic Black card stock that is about the same size but angled so you can still see the color at each corner. I embossed the card base, added a bit of silver glimmer paper (this piece was left over from using the Tasteful Trims die) for a little sparkle, and adhered the focal point to the card with foam dots.
Short on time? Skip the "fussy cutting" and cut or trim the focal image on the dashed-line border around the words. Color in just the slice of cake for a pop of color and use a straight strip of glimmer paper. Omit the embossed background or replace it with a simple layer of coordinating DSP.
Supplies (all Stampin' Up! unless otherwise noted):
Stamps: Endless Birthday Wishes
Paper: Smoky Slate, Old Olive, Daffodil Delight, Whisper White card stock
Ink: Smoky Slate, Memento Tuxedo Black; Blendabilities: Smoky Slate, Old Olive, Daffodil Delight, Soft Sky assortments
Accessories: Honeycomb embossing folder, Scallop Edge border punch, Regals Candy Dots, 1/8" silver ribbon, Mono Multi liquid glue, foam dots (unknown)
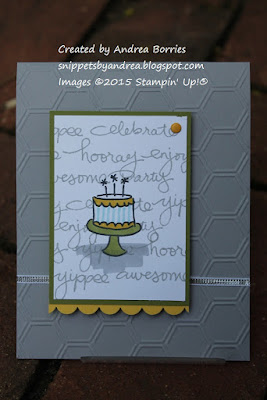
The Endless Birthday Wishes stamp set has a number of different words and phrases that you can combine to make different sentiments. For the focal image on this card I stamped several of the individual words with Smoky Slate ink to make a background. I stamped the cake image over the words and created a quick shadow with a few marker strokes. Then I stamped the cake image again on a separate piece of Whisper White card stock, colored it, cut it out and glued it over the cake image on the focal panel. I layered the piece on Old Olive card stock, added a scalloped Daffodil Delight border (love how that mimics the decoration on the cake) and placed a Candy Dot in the upper right corner. To finish the card I wrapped a piece of silver ribbon around the embossed card base and adhered the focal panel with foam dots.
Short on time? Stamp the cake once on the focal panel, color it (if desired) and stamp one word below the cake. Omit the punched scalloped border or replace it with a mat of Daffodil Delight around the whole focal panel.
Did you like the "short on time" tips? Were they useful or too obvious? If you found them helpful, leave me a comment below, and I'll try to include them in future posts. Thanks for stopping by!


No comments:
Post a Comment