Saturday, February 27, 2016

Birthday cards for everyone

For my aunt's birthday last November I gave her a gift certificate for a card-making day: I would design and prep the supplies for eight cards (four each of two designs), and she just had to come over and make them. Well, with all the crazy busy-ness of the holidays, we didn't get to have our craft day until last week, and I thought I'd share the card designs with you.

Supplies (all Stampin' Up!):
Stamps: Flowering Fields, Petite Pairs
Paper: Wildflower Fields Designer Series Paper (DSP); Hello Honey, Old Olive, Calypso Coral, Basic Black, Whisper White card stock
Ink: StazOn Jet Black, markers - Hello Honey, Basic Black, Old Olive, Calypso Coral
Accessories: Envelope Liner Framelits dies, Basic Black baker's twine, Dimensionals

My aunt requested birthday cards, and I actually decided to do three designs -- one feminine, one masculine, and one neutral -- with three cards of each design. So my aunt got a bonus card. Sweet!

For this card design, I used two of the current Sale-A-Bration products: the Flowering Fields stamp set and coordinating Wildflower Fields DSP. I used the same stamped focal panel for each card but changed the color of the card base and the DSP. Did you know that you can customize your DSP? The pattern I used on the Hello Honey card on the left was originally just white with outlined black circles. I used markers to color in some of the circles so the colors of the card were reflected in the DSP. Neat, huh? I forgot to include the envelopes in the picture, but I also made an envelope liner for each card using the same DSP. I want to try to do that more often to use up my patterned papers.

Supplies (all Stampin' Up! unless otherwise noted):
Stamps: Traveler, Work of Art, Perfect Pairings
Paper: Sahara Sand, Very Vanilla, Basic Black card stock; Going Places DSP stack
Ink: Sahara Sand, Lost Lagoon, Delightful Dijon, Mossy Meadow, Memento Tuxedo Black
Accessories: 1-3/8" square punch, metallic hemp cord (Hemptique), sponge, Dimensionals

I knew I wanted to use the Traveler stamp set for the masculine card design, but I was stumped. I searched for some online inspiration and found many great samples, including one that used the abstract images from Work of Art to add color and one that used parts of the images in a square punch. I also wanted to use some of the new Going Places DSP stack, which has great patterns for masculine card designs, so I combined all of those elements into this card design. I sponged the edges of the Very Vanilla squares with Sahara Sand ink to enhance the vintage look, and for a simple embellishment I tied a piece of metallic cord around the card front.

Supplies (all Stampin' Up! unless otherwise noted):
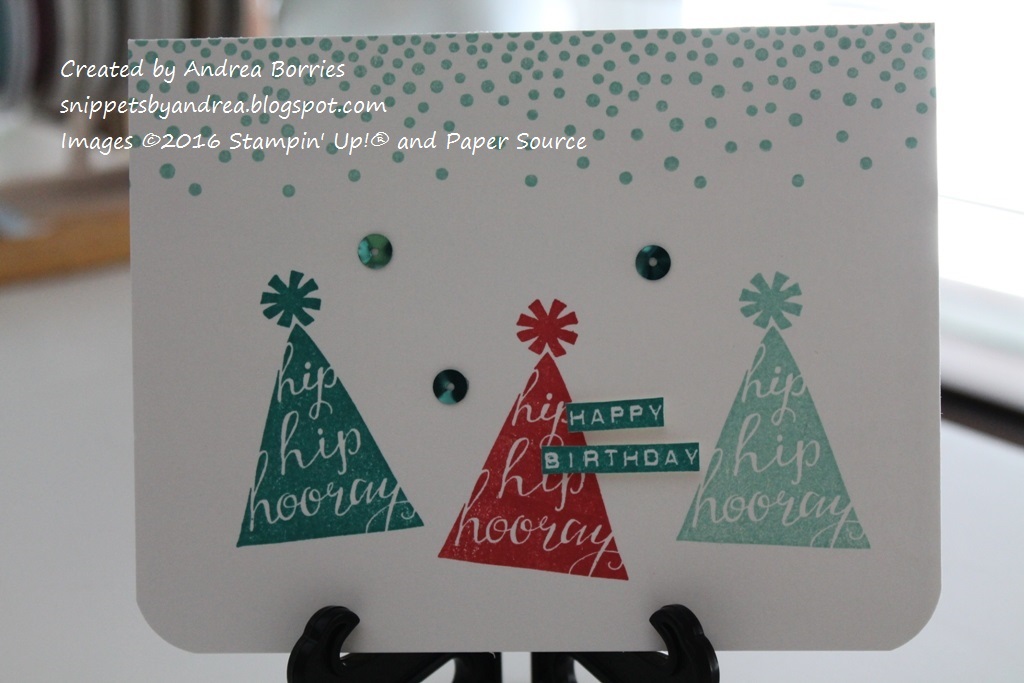
Stamps: Silhouettes & Script, Champagne Dots (Paper Source)
Paper: Thick Whisper White card stock
Ink: Pool Party, Watermelon Wonder, Bermuda Bay
Accessories: Bermuda Bay sequin trim, Corner Chomper (We R Memory Keepers), Glue Dots, Dimensionals

For the third design, I went with a single-layer card that would be great for any recipient. I stamped the party hats in two coordinating blues -- Bermuda Bay and Pool Party -- and Watermelon Wonder for a little punch. To create the look of confetti, I stamped a dotted border along the top of the card and added a few sequins. For the sentiment I stamped and cut out the "Happy Birthday" and adhered it to the card with narrow strips of Dimensionals.

Thanks for stopping by!

Tuesday, February 23, 2016

Soft and simple baptism card

A couple of weeks ago I needed to make a baptism card for my cousin's new daughter. I used a design I'd made for a first communion card a couple of years ago for inspiration and created this card:

Supplies (all Stampin' up! unless otherwise noted):
Stamps: work of Art, Teeny Tiny Wishes
Paper: Whisper White note card, white Crinkles Cardstock (Wausau Paper)
Ink: Blushing Bride
Accessories: Lattice die, Artisan Embellishment Kit, Wink of Stella clear glitter brush pen, Simply Scored tool, Mono Multi liquid glue

I wanted a soft background for this card, so I used one of the "swoosh" stamps from the Work of Art set with Blushing Bride ink. I stamped the image near the top of the note card and then, without re-inking, stamped it twice more moving down the card. (The third swoosh is very light and hard to see in this picture, but it's there.) Then I used the Simply Scored tool to emboss a border and stamped a greeting in the lower right corner.

For the focal image, I cut out the Lattice die from white Crinkles Cardstock. I trimmed the die-cut piece down to the shape of a cross and adhered it to the card front. With a clear Wink of Stella glitter brush pen, I added just a touch of sparkle to the cross. A delicate pink flower in the center of the cross was the perfect finishing touch.

Thanks for stopping by!

Friday, February 19, 2016

Not just for Valentine's Day

I finally downloaded the pictures for the rest of my Valentine's Day cards to my computer. I know they're a little after the fact, but these aren't traditional valentines -- they're designs that would be great whenever you want to say I love you, I'm thinking of you, or even just hello.

Supplies (all Stampin' Up! unless otherwise noted):
Stamps: Three Amigos (Mama Elephant)
Paper: Pocket Notes cards and envelopes, Typeset Specialty Designer Series Paper (DSP), Very Vanilla card stock
Ink: Memento Tuxedo black, Skin Tones and Cherry Cobbler Blendabilities markers
Accessories: Three Amigos Creative Cuts dies (Mama Elephant), cranberry grosgrain ribbon, Dimensionals

Stampin' Up! sold these little Pocket Notes years ago, and I love to use them for valentines. Here I used a piece of DSP for the background with a die-cut and colored focal image. I added a piece of grosgrain ribbon along the right side for a little embellishment.

Supplies (all Stampin' Up! unless otherwise noted):
Stamps: Sunday Stroll (Mama Elephant)
Paper: Notes cards and envelopes, Very Vanilla card stock
Ink: Memento Tuxedo black; Skin Tones, Soft Sky and Cherry Cobbler Blendabilities markers
Accessories: Sunday Stroll Creative Cuts dies (Mama Elephant), Beach House washi tape, Dimensionals

This is another Pocket Notes design. I needed a few valentines for little boys, and I thought this would be the perfect image. No frilly-ness or hearts except in the little trail of the paper airplane. And I replaced the ribbon with washi tape.

Supplies (all Stampin' Up! unless otherwise noted):
Stamps: Hello Sunshine (Lawn Fawn)
Paper: Love Notes cards and envelopes, Whisper White card stock
Ink: Memento Tuxedo Black, Blushing Bride, Watermelon Wonder
Accessories: Hello Sunshine Lawn Cuts dies (Lawn Fawn), Dimensionals

This is a very simple 3" x 3" card, but it's still pretty cute. The card base is Soft Sky, which was a perfect background for stamped clouds and two heart-shaped balloons.

Supplies (all Stampin' Up! unless otherwise noted):
Stamps: Hello Sunshine (Lawn Fawn)
Paper: Whisper White note cards and envelopes, Whisper White card stock
Ink: Memento Tuxedo Black, Pool Party, Blushing Bride, Watermelon Wonder, Crushed Curry
Accessories: Hello Sunshine Lawn Cuts dies (Lawn Fawn), Bermuda Bay sequin trim, Dimensionals, Glue Dots

This is a slightly larger version of the previous card (3-1/2" x 5" note card). Since this card base is white, I stamped the clouds in Pool Party and added a bright sun. Three balloons and a few sequins finish the design.

Supplies (all Stampin' Up! unless otherwise noted):
Stamps: Gleeful Gardens (Lawn Fawn)
Paper: Whisper White note cards and envelopes, Whisper White card stock
Ink: Memento Tuxedo Black, Skin Tones and Cherry Cobbler Blendabilities markers, Stardust Clear Gelly Roll pen (Sakura)
Accessories: Gleeful Gardens Lawn Cuts dies (Lawn Fawn), Dimensionals

I think these little mushrooms are pretty cute. I colored them with two different shades of Cherry Cobbler Blendabilities markers and added a smiley face to one of the larger maushrooms. Since this card didn't have any other embellishment, I colored the white spots on the mushrooms with a glitter pen for just a little sparkle.

Thanks for stopping by!

Thursday, February 18, 2016

Wildlife thoroughfare

I went outside Monday morning to put out fresh birdseed and found this funny sight:

Not too many people use the sidewalk along the side of our house, but clearly it's a thoroughfare for the bunnies and squirrels of the neighborhood.

Thanks for stopping by!

Saturday, February 13, 2016

You're stinkin' cute

I managed to get all of my valentines done and in the mail on Thursday. In fact, as I was putting on the last postage stamp, I looked out the window and saw the mail carrier across the street. Just in the nick of time!

Supplies (all Stampin' Up! unless otherwise noted):
Stamps: Stickin' Cute (Lawn Fawn)
Paper: 110-lb white card stock (Recollections), Whisper White card stock
Ink: Memento Tuxedo Black, Blendabilities markers Smoky Slate and Skin Tones assortments, alcohol markers R81 and R85 (Copic)
Accessories: Stinkin' Cute Lawn Cuts dies (Lawn Fawn), pearls, Blushing Bride sequin trim, Corner Chomper (We R Memeory Keepers), Glue Dots, Dimensionals

I love this adorable stamp set -- the sentiment is definitely accurate -- and it's perfect for this clean and simple card design.

I started by stamping, coloring and die cutting the skunk, flower and heart pieces. With Glue Dots I adhered the flower and heart onto the skunk. I stamped the "scent swirls" on the card base, used Dimensionals to attach the skunk and stamped the sentiment just below the focal image.

I wanted to add a little embellishment without overpowering the focal image. So I placed a tiny pearl in the middle of the flower and used Glue Dots to attach three sequins. (It's hard to tell in the picture, but they're pink sequins and look really cute with the other touches of pink on the card.)

I think I'll be able to share the rest of my valentines in my next post; I have a few 3" x 3" designs that I made for my cousins. Thanks for stopping by!

Tuesday, February 9, 2016

Quick and cute valentines

As I mentioned in my last post, I have some 4" x 4" cards to share from the box of Valentine's Day cards that I sent to a local Meals on Wheels organization. Here is the first quick and cute design:

Supplies (all Stampin' Up!):
Paper: Basic Gray card stock, textured Riding Hood Red card stock, Neutrals Designer Series Paper (DSP) Stack
Accessories: Lattice die, Sweetheart punch, silver sequins, Dimentionals, Mono Multi liquid glue, Glue Dots

I love making this size card for valentines. I cut four card bases from a 12" x 12" piece of card stock and use the remaining 4" x 4" square for punching out hearts. The cards also fit in a standard A2 envelope, so they are easy to mail.

For a little variety I used three different colors for my card bases -- Riding Hood Red, Purely Pomegranate, and Real Red -- four twelve cards total. The layer of DSP in the background is 3-1/2" x 3-1/2" square, so I was only able to get nine pieces from one sheet of DSP. I didn't want to cut up a second piece, so for the last three cards I changed the design and used the leftover strips of DSP:

Supplies (all Stampin' Up! unless otherwise noted):
Paper: Basic Gray card stock, textured Real Red card stock, Neutrals DSP Stack
Accessories: Sweetheart punch, red baker's twine (unknown), Mono Multi liquid glue, Glue Dots

It's a simple design but still cute, and I don't think it's too "girly," which can happen with valentines. Instead of adding sequins on this card, I used a baker's twine bow for a little embellishment.

So that's it for my donated valentines this year. Now I'm trying to get my own valentines finished so I can get them in the mail by Thursday (I hope!). Thanks for stopping by!

Tuesday, February 2, 2016

Blooming Valentine's Day greetings

So I was on a bit of a roll with my blog posts and then got bogged down with work and making valentines to donate to Meals on Wheels. Sigh. But I finally finished the valentines and delivered them today. I was only able to make sixty (I'd wanted to make one hundred), but I know the ones I did make will be appreciated, and I hope they bring a little sunshine to the recipients.

So for my sixty cards, I used the fifteen cards I made from the January Paper Pumpkin kit; twenty-five flower-themed cards, which I'm sharing today; and twelve simple 4" x 4" cards, which I'll try to post later this week. For the rest of the group I found eight suitable cards in my stash and added a Happy Valentine's Day greeting.

Supplies (all Stampin' Up! unless otherwise noted):
Paper: 110-lb white card stock (Recollections), textured Old Olive card stock, The Sweetest Thing - Tangerine paper pad (My Mind's Eye), red glimmer paper, watering can die cuts (The Paper Cut)
Ink: Project Life journaling pen
Accessories: Fancy Fan embossing folder, Pansy punch, Small Heart punch, Dimensionals, Mono Multi liquid glue

This is an unusual size card, about 4" x 9". I had a pack of long silver envelopes I wanted to use, so I designed a card to fit the envelopes. It had to be a design that was tall and narrow, so I decided on flowers in a watering can. I had a pack of watering can die cuts in different metallic colors, and I embossed them with the Fancy Fan embossing folder for a little texture. I hand-cut the stems and leaves, and I punched four flowers from coordinating paper for each card (I included one flower on the inside of the cards). To give the flowers a little dimension I curled up the petals a bit and then glued down just the middle of the flowers.

I wanted to give this card design a little Valentine's Day feel, so I added a small red glimmer paper heart to the center of each flower, and I wrote a note inside that said "I hope your day blooms with happiness." For one final touch I doodled a border around the front of the card. It's definitely not a traditional Valentine's Day card, but I really like how they turned out.

Thanks for stopping by!